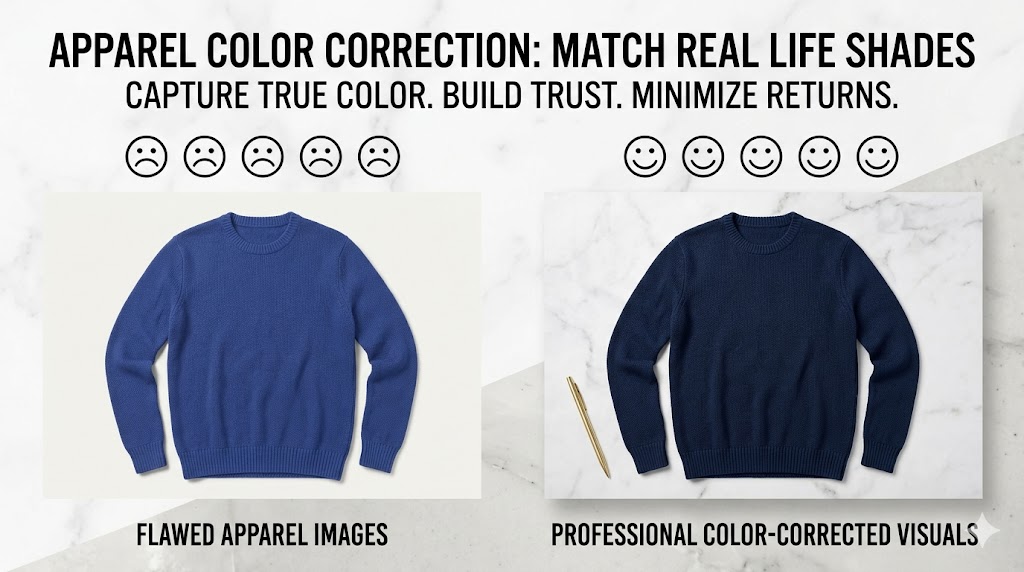
Color correction for apparel photos starts with a simple but costly scenario: a customer orders a “navy” sweater. It arrives looking closer to royal blue. They return it, leave a frustrated review, and never buy from you again.
This is the single most expensive problem in apparel eCommerce, and it is almost always a color problem. Proper color correction for apparel photos is what separates a confident purchase from a guaranteed return.
This guide shows you exactly how color correction for apparel photos works, why it matters to your bottom line, and how to get it right at scale.
Why Color Accuracy Is a Revenue Problem, Not a Vanity Metric
Returns are the quietest margin killer in fashion. The numbers make the case for color correction for apparel photos better than any argument could.
Apparel carries the highest return rate of any eCommerce category, sitting around 25% on average. This is why color correction for apparel photos is a direct revenue strategy, not just a visual nicety.
Each return costs real money to process. Industry analysis shows a single return costs between $10 and $65 once you factor in shipping, labor, inspection, and restocking. Color mismatches feed directly into this cost.
The Color-Specific Damage
Color is not a minor factor. Research indicates that sizing, fit, and color issues together cause 45% of all returns — making color correction for apparel photos one of the highest-ROI investments a seller can make.
When your photo shows one shade and the garment is another, you have created a return before the box even ships. This is precisely why color correction for apparel photos matters so much for reducing return rates.
Color correction for apparel photos is one of the cheapest fixes available. Unlike fit, which depends on the customer’s body, color is entirely within your control.
What “Color Accurate” Actually Means
Color correction for apparel photos is not about making a garment look pretty. It is about making the photo match the physical product as closely as the screen allows.
Photographers measure this difference using a metric called Delta E. It quantifies the gap between two colors so you can judge how far off a photo is.
The scale is intuitive once you know it:
- Delta E ≤ 1: The difference is barely perceptible to the human eye
- Delta E ≤ 2: Considered excellent, professional-grade accuracy
- Delta E ≤ 3: No visible distortion for most viewers
- Delta E above 3: The color is visibly wrong and likely to cause complaints
Your goal for apparel is a Delta E of 3 or lower. You can learn more about the science behind this in BenQ’s guide to Delta E.
The Root Causes of Color Errors
Before you can fix color, you need to understand why it goes wrong. Most apparel color problems start at the camera, not the edit.
Bad Lighting and White Balance
Light has a color temperature. Warm tungsten bulbs cast an orange tint, while overcast daylight casts blue.
If your camera’s white balance is set incorrectly, every color in the frame shifts. A neutral white shirt photographed under warm light will look cream, throwing off every other shade in the image.
Uncalibrated Screens
You cannot correct what you cannot see accurately. An uncalibrated monitor may display colors that look perfect to you but are completely wrong on a customer’s device.
This is why professional editors work on calibrated displays. A monitor calibrated to a low Delta E ensures the color you approve is the color customers actually receive.
Fabric and Texture Behavior
Different fabrics reflect light differently. Satin throws bright highlights, velvet absorbs light, and synthetic blends can shift color under different lighting conditions — which is why color correction for apparel photos requires careful manual adjustment.
These properties mean the same dye can photograph differently across two fabrics. This is why professional color correction for apparel photos has to account for both fabric type and finish, not just color values.
Step by Step: How to Do Color Correction for Apparel Photos
Getting accurate color is a repeatable process. Follow these steps in order and you will dramatically reduce shade mismatches.
Step 1: Shoot With a Color Reference
Place a gray card or color checker in your first frame of each setup. This gives you a known neutral reference to correct against later.
This single habit removes most of the guesswork. It tells your editing software exactly what “neutral” should look like under your specific lighting.
Step 2: Set a Proper White Balance
In your editing software, use the gray card to set white balance first. This neutralizes any color cast from your lighting before you touch anything else.
White balance is the foundation. Getting it right makes every following adjustment faster and more accurate.
Step 3: Work in the Right Color Space
Export your final images in the sRGB color space. This is the standard that web browsers and marketplaces display correctly.
A photo edited in a wider color space like Adobe RGB can look dull or shifted when uploaded online. Converting to sRGB ensures the color survives the trip to your customer’s screen.
Step 4: Match Against the Physical Garment
Hold the actual garment next to your calibrated screen and compare. Adjust hue and saturation until the on-screen color matches the fabric in your hand.
This final human check catches errors that automated tools miss. Your eye, paired with the real product, is the ultimate quality control.
Step 5: Keep Color Consistent Across the Set
Every image of the same product must show the same shade. A main image and detail shots that disagree on color confuse buyers and erode trust.
Apply your corrections consistently across the entire gallery. Consistency signals professionalism and reassures the shopper.
Common Color Correction Mistakes to Avoid
Even careful sellers fall into a few predictable traps. Watch out for these.
- Over-saturating to make products “pop” — this makes garments look artificial and sets false expectations
- Editing on a phone or uncalibrated laptop — the colors you see are not the colors customers see
- Ignoring the gray card — skipping the reference forces you to guess at neutral
- Inconsistent edits across a catalog — different shades for the same SKU across listings looks careless
- Exporting in the wrong color space — Adobe RGB files often display incorrectly on the web
Each of these is avoidable with a disciplined workflow. The fix is process, not expensive gear.
Why Some Colors Are Harder Than Others
A few shades are notorious for causing problems in apparel photography. Knowing them helps you slow down where it counts.
Deep blues and purples often shift toward one another on screen. Reds can blow out and lose detail under strong light. Blacks and charcoals can flatten into a single muddy tone.
These tricky shades demand extra attention during correction. A garment that looks “close enough” in red or navy is exactly the kind that triggers returns.
Get a Free Test Image and See the Difference
Building a calibrated, color-accurate workflow takes time, equipment, and a trained eye. For a busy seller managing hundreds of SKUs, doing this in-house is rarely realistic.
That is precisely what we handle at Photo Fix Team. We color correct apparel photos to match the real garment, edit on calibrated displays, and deliver consistent, web-ready images across your entire catalog.
See it on your own product. Send us one apparel photo and we will color correct it to match real life, completely free. Claim your Free Test Image here and watch a problem shade turn into an accurate, return-proof image.
Color Correction Across Different Sales Channels
If you sell on multiple platforms, your color correction for apparel photos gives you an edge everywhere. The standard, however, stays the same across all channels.
Amazon, Shopify, Walmart, and Etsy all display in sRGB and all reward accurate, trustworthy images. A single well-corrected master file works across every channel.
This is the hidden efficiency of doing color right once. You correct the image properly a single time, then deploy it everywhere with confidence.
The Business Case in One Sentence
Accurate color correction for apparel photos reduces returns, protects your reviews, and builds the trust that turns one-time buyers into repeat customers.
For a category where returns can reach 50%, that is not a small win. It is one of the highest-leverage improvements you can make to your listings this week.
Frequently Asked Questions
Why do my apparel photos look different from the real product?
The most common causes are incorrect white balance, poor lighting, or an uncalibrated monitor. Each of these shifts the colors away from the true shade of the garment.
What is a good Delta E value for apparel photos?
Aim for a Delta E of 3 or lower. At this level, the difference between your photo and the real garment is not visibly distracting to most customers.
Does color accuracy really reduce returns?
Yes. Since color and fit issues drive a large share of returns, matching your photos to the real product directly cuts down on disappointed customers and costly returns.
What color space should I use for online apparel photos?
Always export in sRGB. It is the standard color space that web browsers and marketplaces display correctly, ensuring your colors look right to shoppers.
Can I color correct apparel photos on my phone?
It is not recommended for final work. Phone screens are not calibrated, so the colors you approve may look completely different on a customer’s device.
Final Word
Color accuracy is one of the few return drivers you fully control. Get it right and you protect your margins, your reviews, and your reputation in one move.
Shoot with a reference, edit on a calibrated screen, and match against the real garment. When you would rather hand it off and know it is done right, Photo Fix Team is one free test image away.
🚀 Ready to Grow Your eCommerce Business with Professional Clipping Path Services?
Photo Fix Team delivers fast, precise, and affordable clipping path services for eCommerce businesses of all sizes — background removal, white background compliance, ghost mannequin, shadow effects, color correction, and bulk catalog editing with guaranteed quality.
Get a Free Quote Today →