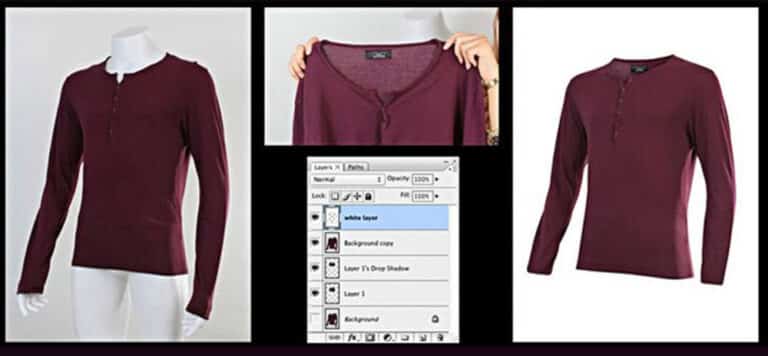
Ghost mannequin photography is the gold standard for eCommerce apparel brands that want studio-quality, 3D clothing photos without the cost and scheduling headaches of hiring live models. Also known as invisible mannequin photography or the hollow man effect, this technique combines multi-angle studio shooting with precision Photoshop compositing so garments appear naturally filled out—while the mannequin completely disappears.
When shoppers browse fashion stores on Amazon, Shopify, or Walmart, they cannot touch the fabric or try on the fit. Flat lays often look lifeless, and live models can distract from garment details or blow through your photography budget. By mastering ghost mannequin product photography, you show exact drape, structure, collar lining, and true-to-life proportions—helping apparel stores increase conversion rates and cut size-and-fit returns.
In this complete guide, we walk you through everything from choosing a modular mannequin and dialing in studio camera settings to shooting the two-shot method, editing seamless neck joints in Photoshop, and deciding when to outsource post-production at scale.
What Is Ghost Mannequin Photography and Why Does It Convert Better?
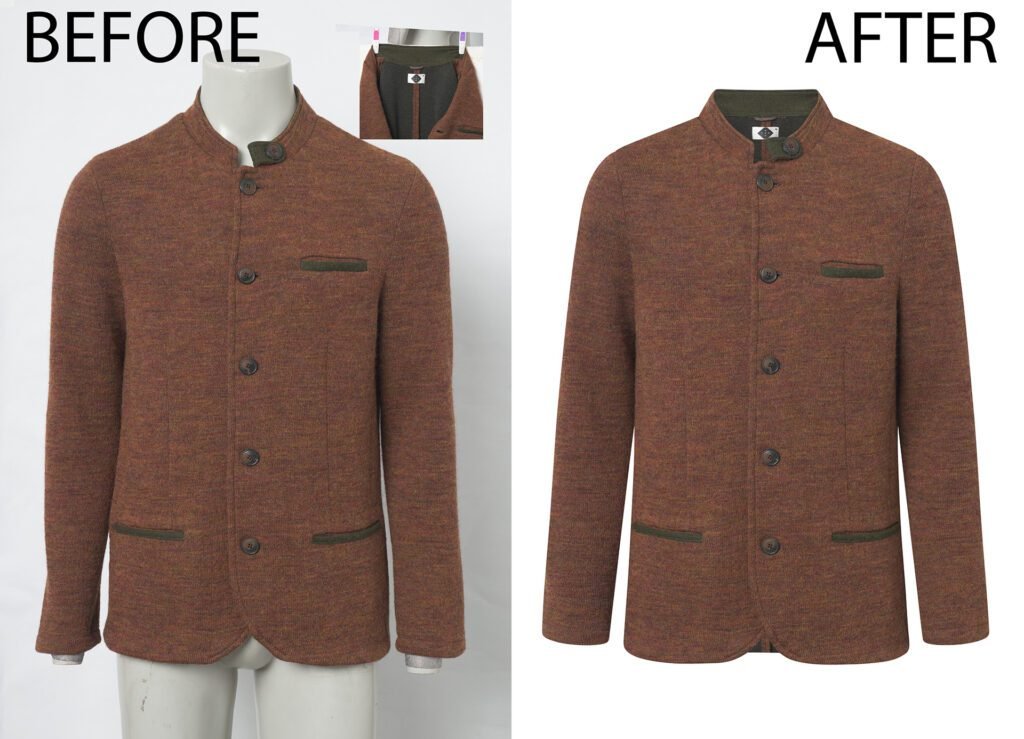
Ghost mannequin photography is a two-stage apparel production workflow: first, you photograph a garment dressed on a mannequin (plus a separate shot of the interior collar, cuff, or hem); second, a retoucher merges those images in post-production so the mannequin is erased and the inside lining shows naturally through the neck or waist opening.
Unlike flat lay photography—which flattens collars, shoulders, and waistlines—the invisible mannequin effect preserves three-dimensional volume. Shoppers can immediately see how a tailored blazer tapers at the waist, how a hoodie sits across the shoulders, or where a dress cinches.
Here is why high-growth fashion brands rely on it across their catalogs:
- Zero visual distraction: The shopper’s eye stays 100% on fabric texture, stitching, and silhouette—not a model’s pose, hair, or expression.
- Catalog-wide consistency: Every shirt, jacket, and dress sits at the exact same height, angle, and lighting ratio across your collection pages.
- Faster marketplace compliance: Clean
#FFFFFFpure white backgrounds meet strict main-image rules covered in your guide to marketplace-approved product images. - Lower cost per SKU: Once your studio setup is locked in, shooting 40–80 garments per day is far faster and more affordable than booking models, stylists, and makeup artists.
Still deciding whether models or mannequins make more sense for your store? Read our detailed breakdown on ghost mannequin vs. live model photography to compare ROI by brand stage.
Ghost Mannequin vs. Flat Lay vs. Live Model: Quick Comparison
Choosing the right apparel photography style depends on your garment structure, SKU volume, and budget. Use this comparison table to map each method to your catalog:
| Factor | Ghost Mannequin Photography | Flat Lay Photography | Live Model Photography |
| 3D Fit & Shape Accuracy | High (shows realistic drape & volume) | Low (looks flat on structured items) | Very High (shows real body movement) |
| Cost per SKU | Low to Moderate | Lowest | High (model, stylist, studio fees) |
| Catalog Consistency | Excellent (identical framing & angles) | Good | Moderate (varies by model & pose) |
| Production Speed | Fast (40–80+ SKUs/day) | Very Fast | Slow (15–30 SKUs/day) |
| Marketplace Main-Image Ready | Yes (Amazon, Shopify, Walmart) | Yes (for basics/accessories) | Restricted in some categories |
| Best Garment Types | Jackets, hoodies, shirts, dresses, blazers, pants | T-shirts, knitwear, kids’ basics, accessories | Hero banners, luxury lookbooks, activewear |
Pro tip: Many top apparel brands use ghost mannequin photography for their primary product gallery (front, back, and side catalog shots) and reserve live models for lifestyle secondary images and social ads.
Essential Studio Equipment for Ghost Mannequin Photography
You do not need a $50,000 commercial studio to shoot clean invisible mannequin images, but cutting corners on the mannequin or lighting will create hours of extra retouching work later.
1. Modular Invisible Mannequin (Your Most Important Investment)
Standard retail display mannequins will slow you down because their solid neck and chest block the garment’s interior. Invest in a matte white modular ghost mannequin with magnetic, removable pieces:
- Removable V-neck and scoop-neck chest sections (lets you shoot open collars, button-downs, and V-necks cleanly).
- Detachable arms and shoulder caps (essential for sleeveless tops, tank tops, and vests).
- Matte finish over glossy white (prevents harsh light reflections from bouncing onto dark fabrics).
- Multiple body forms if you sell across categories (men’s torso, women’s torso, plus-size, and hip/leg forms for trousers).
2. Camera and Lens Selection
Any modern DSLR or mirrorless camera (24MP or higher) works well. Your lens choice matters much more than the camera body:
- Use a 50mm, 70mm, or 85mm prime/zoom lens (such as a 24–70mm f/2.8 shot around 50–70mm).
- Avoid wide-angle lenses (under 35mm): Wide lenses distort garment proportions, making shoulders look overly broad and hems look narrow.
3. Lighting Setup and Modifiers
Harsh direct light exaggerates wrinkles and casts muddy shadows inside collars. Aim for soft, repeatable studio light:
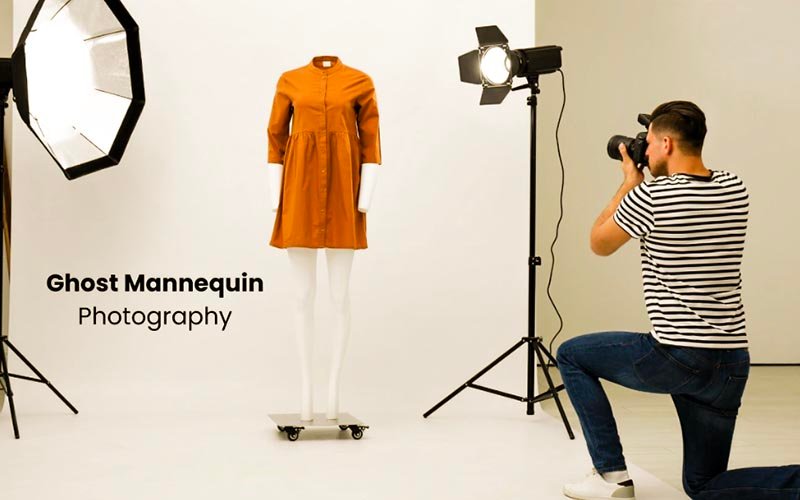
- Two key/fill strobes or continuous LEDs (500W–600W strobes or high-CRI 95+ LEDs) fitted with large softboxes or tall stripboxes placed at 45-degree angles on either side of the mannequin.
- Two background lights aimed solely at your white seamless paper sweep to push the backdrop cleanly to pure white without washing out the garment edges.
- White V-flats or foam core bounce boards to soften shadows on textured fabrics like corduroy or heavy fleece.
4. Styling Kit and Studio Accessories
Great ghost mannequin results happen before you press the shutter. Keep these tools beside your mannequin:
- Commercial garment steamer (removes creases far faster and safer than a flat iron).
- Styling clips, T-pins, and binder clips (used behind the mannequin to cinch loose waists and pull sleeves taut).
- Double-sided fashion tape (keeps collars, lapels, and plackets symmetrical).
- Lint roller and fabric brush (removes stray fibers that become painfully visible at 2000px zoom).
- Heavy tripod + tethering cable (keeps every garment locked to the exact same frame height and lets you inspect sharpness on a laptop screen).
- White foam core board (for shooting clean inside-collar and inner-hem insert shots).
Best Camera Settings and Studio Lighting Setup
Locking your camera into Full Manual (M) mode guarantees that your outer shot and inner neck shot match perfectly in exposure, contrast, and color temperature—cutting post-production time in half.
Recommended Baseline Camera Settings
- Shooting Format: RAW (critical for recovering white highlights and preserving true fabric color).
- Aperture: f/8 to f/11 — This is the sweet spot for sharpness across the entire depth of a garment, keeping both the front buttons and the rear collar crisp.
- ISO: 100 (or your camera’s native base ISO) to keep shadows clean and noise-free.
- Shutter Speed: 1/125s to 1/160s when using studio strobes (stays safely below flash sync speed and blocks ambient room light).
- White Balance: Set a fixed Kelvin value (typically 5500K for daylight strobes/LEDs) and shoot a grey card or ColorChecker at the start of every session. Never leave White Balance on Auto.
- Camera Height: Position the lens dead-center at the garment’s midpoint (usually chest height for tops, hip height for pants). Tilting the camera up or down makes garments look tapered and unnatural.
Mastering Lighting Without Edge Blowout
A common beginner mistake is blasting the white backdrop so brightly that light wraps around the edges of light-colored clothing—erasing the seams of white T-shirts or pastel dresses.
- Place your mannequin 5 to 7 feet in front of the white backdrop so background light does not spill back onto the garment.
- Meter your main front lights first for accurate fabric texture.
- Bring up your background lights until the sweep sits just 1 to 1.5 stops brighter than your subject—clean white, but not nuclear-bright.
Step-by-Step Guide: How to Shoot the 2-Shot Ghost Mannequin Method
The secret behind realistic invisible mannequin photography is capturing matching outer and inner views so the retoucher never has to “fake” or paint in missing fabric.
Step 1: Prep and Steam Every Garment
Remove tags, loose threads, and dust with a lint roller. Steam the garment thoroughly—paying special attention to collars, cuffs, button plackets, and bottom hems. Remember: 2 minutes of steaming saves 15 minutes of retouching per SKU.
Step 2: Dress and Style the Mannequin Symmetrically
Slide the garment onto the mannequin and align the center seam straight down the vertical midline.
- Pull shoulders evenly so both sleeves hang at identical angles.
- Use styling clips on the back to create a tailored silhouette (avoid over-pinching, which creates unnatural diagonal tension lines across the chest).
- Remove the mannequin’s neck/chest insert piece if the garment has a deep V-neck, open collar, or low neckline.
Step 3: Capture Shot 1 (The Outer Garment Shot)
Verify framing on your tethered monitor—leave equal breathing room around the shoulders, sleeves, and hem. Focus sharply on the chest/front center of the garment and fire your Outer Shot. If your catalog requires multiple angles, rotate the mannequin 180 degrees now and capture the Back Shot before removing the piece.
Step 4: Capture Shot 2 (The Inner Neck / Lining Insert Shot)
This is the step amateurs skip—and the exact reason their final photos look flat or artificial.
You have two proven ways to capture the inner neck and label:
- Foam Board Method (Fastest for T-shirts, Hoodies & Sweaters): Remove the garment from the mannequin and lay it neatly on a flat white foam core board angled upright at the exact same distance and lighting as the mannequin. Gently fold back the front neckline so the inside back collar, brand label, and inner stitching are fully visible. Shoot!
- Inside-Out Mannequin Method (Best for Structured Jackets & Blazers): Turn the garment inside-out and dress it back onto the mannequin so the inner lining keeps the exact same 3D curvature as Shot 1. Shoot the neck, lapel lining, and bottom inner hem.
Garment-Specific Shooting Tips
- T-Shirts & Polos: Keep sleeves naturally relaxed at a slight downward angle; button polos halfway or all the way consistently across every SKU.
- Hoodies & Pullovers: Stuff the hood lightly with tissue paper so it holds a natural 3D shape instead of collapsing behind the neck, and tie drawstrings neatly at equal lengths.
- Jackets & Blazers: Keep the top button fastened for tailored structure; shoot an extra inner-hem insert shot if the jacket tail curves open at the bottom.
- Dresses & Skirts: Use a full-length modular mannequin and capture an inner bottom-hem shot so the back interior of the skirt is visible beneath the front hem.
- Pants & Jeans: Use a leg mannequin form flipped upside-down if needed to reveal the inside waistband clearly, and ensure both pant legs hang parallel without twisting.
Post-Processing: How to Create the Ghost Mannequin Effect in Photoshop
Once your RAW files are captured, post-production brings the 3D illusion to life. Whether you edit in-house using Adobe Photoshop or partner with a dedicated apparel photo editing team, every professional invisible mannequin edit follows six core steps:
1. RAW Calibration and Exposure Sync
Open both Shot 1 (Outer) and Shot 2 (Inner) together in Adobe Camera Raw or Lightroom. Apply your grey-card white balance profile and sync exposure, contrast, and color tint across both files so the inner collar fabric matches the outer garment seamlessly.
2. Precision Clipping Path Around the Outer Garment
Skip automatic magic-wand selections on high-value apparel—they leave jagged edges and stray white halos on dark fabrics. Trace the outer silhouette manually using the Pen Tool (with a subtle 0.5px feather) to create a razor-sharp clipping path. Convert the path into a Layer Mask and place a solid pure white (#FFFFFF) background layer underneath.
3. Mask Out the Mannequin and Isolate the Inner Neck
On Shot 1, carefully mask out every visible section of the white mannequin around the neck, sleeves, and bottom hem. Next, open Shot 2, trace only the interior collar, brand tag, and lining area using the Pen Tool, and copy it into your master file.
4. Composite and Align the Neck Joint
Drag the inner neck layer underneath the outer garment layer. Use Free Transform (Ctrl/Cmd + T) and Warp to align the inner collar curve smoothly with the shoulder seams of Shot 1. Check closely at 200% zoom to ensure zero gaps, double edges, or misaligned stitching.
5. Add Natural Inner Shadow for 3D Depth
Without shading, the inner collar looks like a flat sticker pasted behind the shirt. Create a clipped Curves or soft low-opacity Multiply brush layer directly on the inner neck piece and paint a subtle, directional shadow just inside the neckline edge and under the collar folds. This single detail separates amateur cutouts from luxury eCommerce imagery.
6. Symmetry, Retouching, and eCommerce Export
Finish the file like a commercial catalog image:
- Symmetry & Shape: Use subtle Liquify adjustments to balance shoulder heights, level bottom hems, and straighten sleeves—without distorting plaid or striped patterns.
- Clean Retouching: Remove dust, stray lint, and harsh creases while preserving authentic fabric grain (never over-blur knitwear or denim).
- Export Specs: Crop consistently (e.g., 85% garment frame fill on a
2000 × 2000pxsquare or4:5vertical canvas), convert color space to sRGB, and export optimized WebP/JPEG files for fast page speed.
If your store sells across multiple channels, double-check platform-specific dimensions—for example, our Walmart marketplace image guidelines outline exact zoom and aspect-ratio requirements.
5 Common Ghost Mannequin Photography Mistakes (and How to Fix Them)
Even experienced photographers run into recurring snags during high-volume apparel shoots. Watch out for these five pitfalls:
- Mismatched Lighting Between Outer and Inner Shots: Shooting the insert flat under a different light angle makes the inner collar look brighter or differently tinted. Fix: Shoot the foam-board insert inside the exact same light setup before moving a single stand.
- Skipping the Inner Neck Shadow: Leaving the inside collar as bright as the front chest destroys the 3D illusion. Fix: Always darken the interior neckline slightly (
10%–20%) to mimic natural ambient occlusion. - Leaving Wrinkles “to Fix in Photoshop”: Fixing deep creases digitally takes 5x longer and often blurs fabric texture. Fix: Steam every piece right before dressing the mannequin.
- Inconsistent Camera Distance Across SKUs: Moving the tripod slightly between garments causes jackets and shirts to jump up and down on your Shopify collection grid. Fix: Mark tripod feet and mannequin base positions on the studio floor with gaffer tape.
- Over-Clipped White Edges on Light Garments: Overexposing the white backdrop bleeds light over white shirts, making edges disappear. Fix: Keep background lights controlled and add black flags (negative fill) on both sides of white clothing to define clean edge contrast.
DIY Editing vs. Outsourcing Ghost Mannequin Services: Which Scales Better?
Shooting 50 garments in a day is manageable for an in-house team—but hand-masking, neck-jointing, color-matching, and retouching 50–300 SKUs in Photoshop quickly becomes a massive bottleneck.
Consider the real numbers:
- In-House DIY Editing: A skilled Photoshop editor spends 15 to 25 minutes per garment on a clean neck joint, clipping path, wrinkle cleanup, and shadow work. For a 100-SKU seasonal drop, that is 25 to 40+ hours of pure desk work—delaying your product launch by a full week.
- Outsourcing to a Dedicated Team: Professional ghost mannequin photo editing services deliver hand-drawn paths, seamless neck joints, and consistent catalog cropping in 24–48 hours, typically at a fraction of in-house labor costs.
When to DIY: You launch fewer than 10–15 new SKUs per month and have spare in-house editing time.
When to Outsource: You manage seasonal collections, multi-marketplace catalogs, or agency clients where fast turnaround, clean background removal, and strict visual consistency directly impact revenue.
Ready to test the difference on your own apparel photos without any commitment? Send us 1–2 raw shots through our free test edit and see studio-finished results before placing an order—or check transparent per-image rates on our eCommerce photo editing pricing page.
Final Thoughts: Turn Consistent Apparel Photos Into Higher Sales
Mastering ghost mannequin photography comes down to repeatable discipline: invest in a matte modular mannequin, lock in manual camera settings (f/8–f/11, ISO 100, 50–85mm), capture clean outer and inner shots in the same light, and finish every file with crisp Pen Tool masking and realistic inner shadows.
When every garment across your catalog shares the same crisp 3D shape and accurate color, shoppers browse with confidence—and buy without hesitation. Whether you are building an in-house studio or looking for a reliable eCommerce photo editing partner to handle post-production overnight, consistent visual quality is one of the highest-ROI upgrades your apparel brand can make.
What is the difference between ghost mannequin photography and invisible mannequin photography?
There is no difference—ghost mannequin photography, invisible mannequin photography, and the hollow man effect are all terms for the same technique of removing a mannequin in post-production to give clothing a realistic 3D shape.
What camera settings are best for ghost mannequin product photography?
Use Manual mode with an aperture of f/8 to f/11 for front-to-back fabric sharpness, base ISO 100 for noise-free detail, a 50mm–85mm lens to avoid distortion, and a fixed daylight white balance (around 5500K) calibrated with a grey card.
How many shots do I need for a ghost mannequin photo?
At minimum, you need two shots per view: an outer shot of the garment dressed on the mannequin, plus an inner shot showing the interior neck, brand label, or bottom hem so both layers can be blended seamlessly in Photoshop.
Can I do ghost mannequin photography without a special modular mannequin?
Yes, you can shoot on a standard mannequin or hanger and capture the inside collar separately on a white foam board. However, a matte modular mannequin with removable neck and chest pieces makes styling faster and produces cleaner shoulders and necklines.
How long does it take to edit a ghost mannequin image in Photoshop?
Manual Pen Tool clipping, neck-joint compositing, wrinkle cleanup, and natural inner shadow work typically take 15–25 minutes per garment. Outsourcing to a dedicated retouching team lets apparel brands process bulk catalogs in 24–48 hours.
Do Amazon and Shopify allow ghost mannequin photos as main listing images?
Yes. Both Amazon and Shopify welcome ghost mannequin product photos—as long as the main image uses a pure white background (#FFFFFF), fills roughly 85% of the frame, and shows the garment accurately without watermarks or visible mannequin parts.
Photo Fix Team delivers fast, pixel-perfect eCommerce photo editing for online stores, brands, and photographers — background removal, ghost mannequin, retouching, color correction, and bulk catalog editing.
✓ 24–48h Turnaround • ✓ 100% Quality Guarantee • ✓ No Credit Card Required