
Photography is a fantastic way for students to express creativity and capture the world around them. Learning how to pose subjects effectively is a key skill for any aspiring photographer. This guide, “Poses for Photoshoot School Students: Essential Tips & Tricks,” offers practical advice and techniques specifically tailored for student photographers. We’ll explore various posing scenarios and provide easy-to-follow tips to help you create stunning images.
Understanding Basic Posing Principles (Fundamental Posing for Student Photographers)
Before jumping into specific poses, it’s crucial to understand a few fundamental principles. These principles form the foundation of effective posing.
Body language communicates a lot. Consider the mood or message you want to convey in your photos.
- Posture: Good posture is essential for a confident and flattering look. Encourage your subjects to stand tall with their shoulders back.
- Weight Distribution: Shifting weight slightly from one foot to the other creates a more natural and relaxed pose.
- Angles: Experiment with different angles to find the most flattering perspective for your subject.
Head and Shoulder Portraits: Simple Yet Effective (Easy Portrait Poses for School Projects)
Head and shoulder portraits are a common type of photograph, perfect for school projects and practice. These are simple yet effective poses to master.
Avoid having your subject face the camera directly. This can often look flat and uninteresting.
- Head Tilt: A slight tilt of the head adds dynamism and visual interest.
- Chin Position: Ensure the chin is slightly forward and down to avoid a double chin effect.
- Eye Contact: Direct eye contact creates a connection with the viewer. Looking slightly off-camera can create a more contemplative mood.
Full-Body Posing: Creating Dynamic Compositions (Full Body Posing Ideas for Students)
Full-body poses offer more creative possibilities. They allow you to incorporate the background and environment.
Consider the composition as a whole. How does your subject interact with their surroundings?
- The S-Curve: This classic pose creates a flattering silhouette, especially for female subjects.
- Triangles and Shapes: Creating triangles with the limbs adds visual interest and dynamism.
- Hand Placement: Avoid having hands hanging limply at the sides. Encourage natural hand placement in pockets, on hips, or interacting with props.
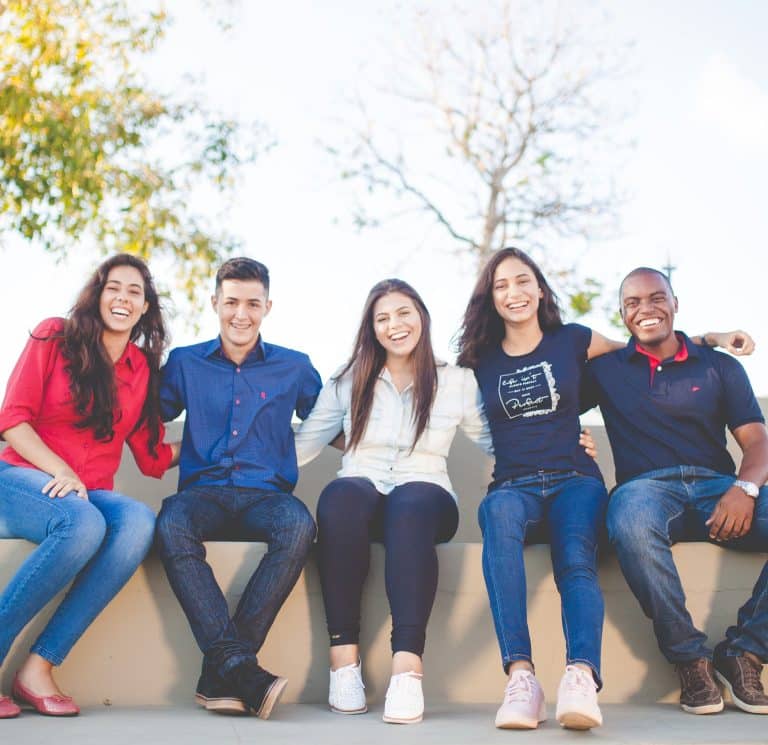
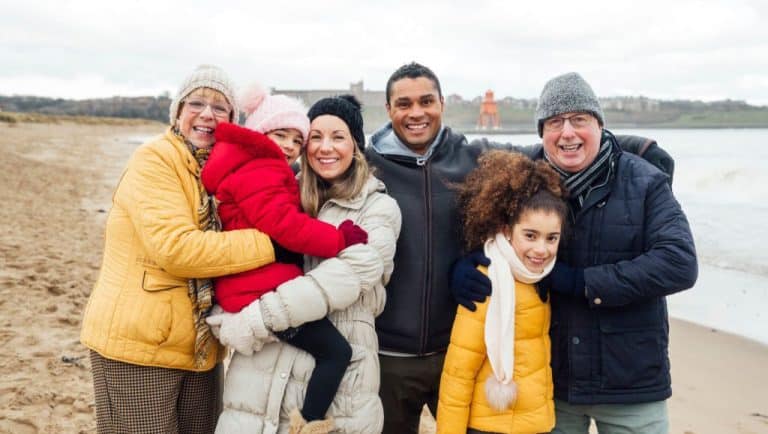
Posing in Groups: Managing Multiple Subjects (Group Posing Tips for School Photos)
Posing groups of people can be challenging. It requires careful planning and organization.
Make sure everyone is visible and looks their best. Consider the height differences within the group.
- Staggering Heights: Arrange people at different heights to create visual interest and avoid a straight line.
- Natural Interactions: Encourage natural interactions between group members, such as looking at each other or laughing.
- Triangles and Overlapping: Use triangular shapes and overlapping to create a cohesive and visually appealing composition.
Posing for Guys: Emphasizing Masculinity (Posing Ideas for Male Students)
Posing male subjects often involves emphasizing strength and confidence. Straight lines and strong angles can be effective.
Avoid overly posed or unnatural positions. Aim for a relaxed and masculine look.
- Shoulders Back and Down: This posture projects confidence and creates a broader shoulder line.
- Weight Shift: Shifting weight to one leg creates a more relaxed stance.
- Hand Placement: Hands in pockets, on hips, or crossed arms can convey confidence.
Posing for Girls: Creating Elegant Lines (Posing Ideas for Female Students)
Posing female subjects often focuses on creating elegant and flattering lines. Curves and soft angles are frequently used.
The S-curve is a popular and effective technique for female posing. It creates a flattering silhouette.
- The S-Curve: This pose creates a feminine and dynamic shape.
- Weight Shift: Shifting weight to one leg accentuates the hips and creates a flattering curve.
- Hand Placement: Softly curved hands and fingers add elegance.
Using Props Effectively in Poses (Incorporating Props in School Photoshoots)
Props can add context, interest, and personality to photos. Choose props that complement the subject and the overall theme.
Ensure the props don’t distract from the subject. They should enhance, not overpower, the image.
- Context and Storytelling: Props can help tell a story or convey a message.
- Visual Interest: Props can add texture, color, and visual interest to the composition.
- Natural Interaction: Encourage your subject to interact naturally with the props.
Posing for Different Body Types: Inclusivity in Photography (Posing for Diverse Body Shapes)
It’s important to adapt posing techniques to different body types. What works for one person might not work for another.
Focus on highlighting each individual’s best features. This creates flattering and confident images for everyone.
- Plus-Size Posing: Avoid poses that compress the body. Focus on creating curves and elongating the figure.
- Petite Posing: Avoid poses that make the person look smaller. Use angles and positioning to create height.
- Tall Posing: Use poses that break up the height and avoid making the person look too imposing.
Communicating with Your Subjects: Building Confidence (Effective Communication for Student Photographers)
Clear communication with your subjects is essential. It helps them feel comfortable and confident.
Provide clear instructions and offer encouragement. A relaxed subject will result in better photos.
- Clear and Concise Instructions: Explain the poses you want them to try in simple terms.
- Demonstrations: If needed, demonstrate the poses yourself.
- Positive Feedback: Offer encouragement and positive feedback to build their confidence.
Practicing Posing Techniques: Developing Your Skills (Practical Exercises for Posing Practice)
Like any skill, posing takes practice. The more you practice, the better you’ll become.
Experiment with different poses and find what works best for you. Don’t be afraid to try new things.
- Practice with Friends and Family: Ask friends or family to model for you.
- Use a Mirror: Practice posing in front of a mirror to see how different poses look.
- Study Professional Photos: Analyze the posing in professional photographs to learn from the best.
Self-Portrait Posing: Taking Your Own Photos (Self-Portrait Tips for Students)
Sometimes you might need to take your own photos. Self-portrait posing requires a different approach.
Using tools like timers and remotes can make the process easier. Consider using mirrors for creative compositions.
- Tripod and Timer: Use a tripod and timer to set up the shot and pose without holding the camera.
- Remote Shutter Release: A remote shutter release makes it easier to trigger the camera.
- Mirror Reflections: Mirrors can create interesting compositions and capture different angles.
Finding Inspiration for Poses: Online Resources (Online Resources for Posing Inspiration)
There are many online resources where you can find inspiration for poses. These resources can help you expand your creative horizons.
Explore different photography styles and find what resonates with you. Don’t be afraid to adapt existing poses to your own style.
- Pinterest: A great source for visual inspiration and posing ideas.
- Instagram: Follow photographers and models for posing inspiration.
- Photography Blogs and Websites: Many photography blogs and websites offer posing tutorials and tips.
School Photoshoot Editing Basics (Simple Photo Editing for Students)
After capturing great poses, editing is the next step in creating polished photos. Basic editing can significantly enhance your images.
Simple adjustments can make a big difference. Focus on enhancing the existing image, not drastically altering it.
- Cropping and Straightening: Correcting the composition and straightening the horizon can improve the overall image.
- Brightness and Contrast: Adjusting these settings can enhance the image’s overall tone and visibility.
- Color Correction: Correcting color casts and adjusting saturation can create more vibrant and accurate colors.
- Basic Sharpening: Adding a touch of sharpness can enhance details and make the image pop.
Introduction to Retouching for School Photos (Basic Retouching Techniques for School Projects)
Retouching is a more advanced editing technique that involves making subtle changes to the subject’s appearance. It’s important to use retouching sparingly, especially for school photos.
The goal is to enhance natural beauty, not create an artificial look. Less is often more when it comes to retouching.
- Blemish Removal: Removing minor blemishes like pimples or temporary marks can create a cleaner look.
- Eye Brightening: Subtly brightening the eyes can make them more engaging.
- Teeth Whitening (Subtle): A very subtle whitening of teeth can improve the overall appearance of a smile.
- Skin Smoothing (Minimal): Avoid excessive skin smoothing, which can make the subject look unnatural. Focus on reducing shine or minor imperfections.
These additions maintain the student-focused approach, emphasizing simple and appropriate editing techniques. They also continue the consistent tone and style of the existing blog post. You can insert these sections before the conclusion.
For students looking for professional-level editing and retouching without the high cost, consider exploring affordable online services. While learning to edit yourself is valuable, sometimes a professional touch can make all the difference, especially for important school projects or portfolio pieces. Photo Fix Team (https://photofixteam.com/headshot-retouching/), while specializing in headshots, also offers retouching services that can be beneficial for student photography projects. They provide quality edits that can enhance your images while maintaining a natural look. Using a service like this can be a great way to elevate your work and learn from the techniques used by professionals. Remember to always use such services responsibly and ethically, focusing on enhancing rather than drastically altering the original image.
Conclusion: Mastering the Art of Posing for School Projects
Mastering posing is a valuable skill for any student photographer. It allows you to create more compelling and engaging images.
By understanding the basic principles, practicing different techniques, and communicating effectively with your subjects, you can significantly improve your photography. Remember to have fun and experiment. This guide, “Poses for Photoshoot School Students: Essential Tips & Tricks,” provides a solid foundation for your journey into the world of photography.

Photo Editing for TikTok Shop Sellers: What Works in 2026
📂 Categories 🛒 Ecommerce Business 📸 E-commerce Photo Tips 🖼️ Platform Image Req. 📦 Amazon…

“Why Your Ecommerce Store Needs Professional Photo Editing”
📂 Categories 🛒 Ecommerce Business 📸 E-commerce Photo Tips 🖼️ Platform Image Req. 📦 Amazon…

eBay Product Photo Requirements 2026: The Complete Seller’s Checklist
📂 Categories 🛒 Ecommerce Business 📸 E-commerce Photo Tips 🖼️ Platform Image Req. 📦 Amazon…

Drop Shipping Product Photos: How to Stand Out When Competitors Use the Same Images
📂 Categories 🛒 Ecommerce Business 📸 E-commerce Photo Tips 🖼️ Platform Image Req. 📦 Amazon…

AI vs Manual Photo Editing for Ecommerce: Which Delivers Better ROI?
📂 Categories 🛒 Ecommerce Business 📸 E-commerce Photo Tips 🖼️ Platform Image Req. 📦 Amazon…
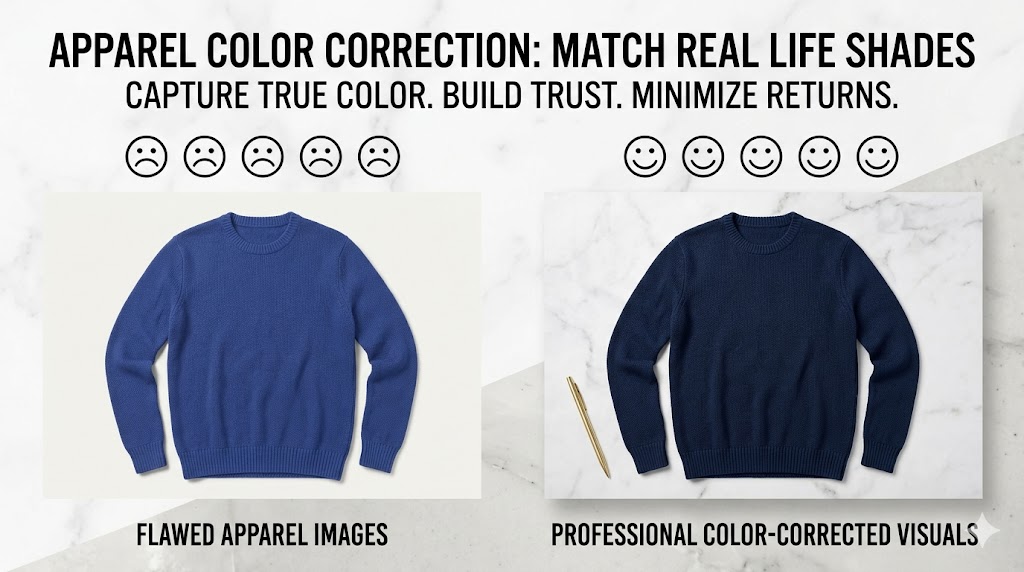
Color Correction for Apparel Photos: Match What Customers See in Real Life
📂 Categories 🛒 Ecommerce Business 📸 E-commerce Photo Tips 🖼️ Platform Image Req. 📦 Amazon…
LET’S COLLABORATE TO ENHANCE YOUR PHOTO
OUR ECOMMERCE PHOTO EDITING SERVICES READY FOR YOU!
Get the Awesome Quote!
One of the most important things is to pick the best professional ecommerce photo editing services company.
Quick Peek at Our Quality!
Every issue that arises will be explained in detail. It’s time to start planning your adventures with our ecommerce photo editing service.