

Introduction of Ghost Mannequin Effect in Photoshop
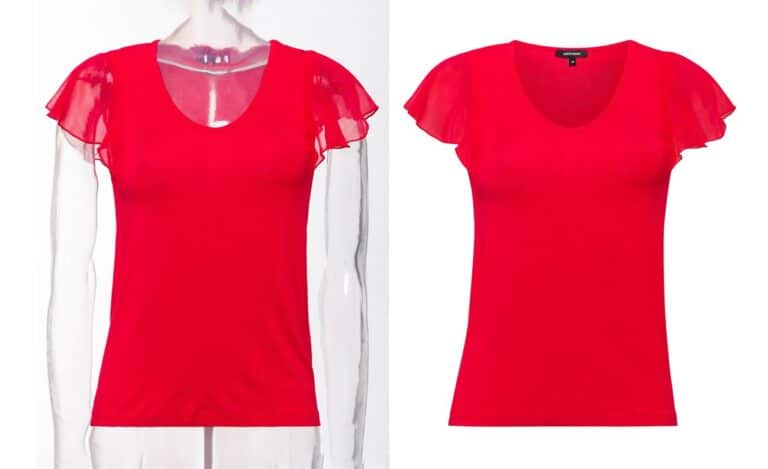
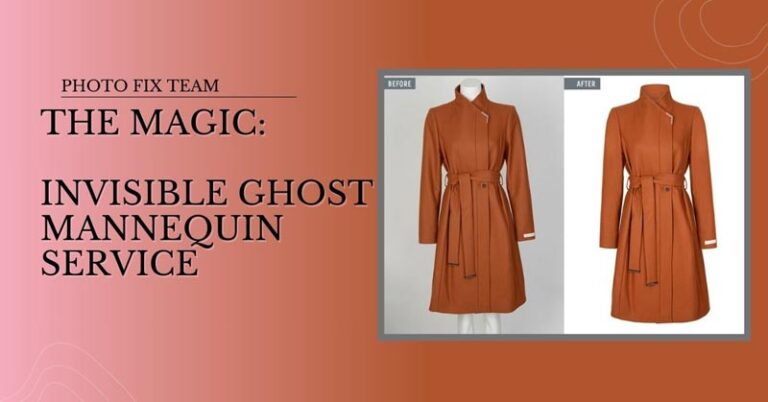
The Ghost Mannequin Effect is a pivotal technique in modern product photography, especially for the fashion industry. By creating an illusion that the clothing is worn by an invisible model, this method showcases garments in a sleek, professional manner. It removes distractions and emphasizes the product, making it a favorite among e-commerce professionals.
What is the Ghost Mannequin Effect and Why is It So Popular?
The Ghost Mannequin Effect is a photographic technique where the mannequin wearing the clothing is digitally removed, leaving just the garment visible. This creates an impression of the clothing floating in mid-air, giving potential buyers a clear view of the product without any distractions. Its popularity stems from its ability to create a clean, consistent look that highlights the details of the garment, making it ideal for online retail.
Why Should You Learn This Technique for Your Product Photography?
Mastering the Ghost Mannequin Effect is essential for photographers looking to break into the e-commerce space. It allows for a professional presentation of clothing items, which can significantly increase sales. Additionally, understanding this technique enhances your versatility as a photographer, giving you a valuable skill set that is highly sought after in the industry.
How Does the Ghost Mannequin Effect Enhance Your E-commerce Images?
E-commerce thrives on visuals, and the Ghost Mannequin Effect provides a polished, clean aesthetic that appeals to online shoppers. It allows customers to see the full design and fit of the garment without the distraction of a mannequin or model, which can sometimes be a deterrent. This effect also allows for a more detailed view of the product, showcasing the garment’s structure and design intricacies.
Tools You’ll Need to Create the Perfect Ghost Mannequin Effect
Creating the Ghost Mannequin Effect requires a few essential tools, including a good quality camera, a sturdy tripod, lighting equipment, and most importantly, a mannequin with removable parts. In post-production, Adobe Photoshop is the software of choice, as it offers the necessary tools for precise editing. Other helpful tools include a pen tablet for more detailed work and color correction software to ensure your images are true to life.
Overview of the Steps We’ll Cover in This Guide
This guide will walk you through the entire process of creating the Ghost Mannequin Effect, from understanding the basics to executing the technique in Photoshop. You will learn how to prepare your images, set up your workspace, and use the necessary tools to achieve a flawless final product. Along the way, we’ll explore common mistakes to avoid and advanced techniques to enhance your work.
Understanding the Basics
What is the Ghost Mannequin Effect?
At its core, the Ghost Mannequin Effect is an image editing technique used to remove a mannequin from a photograph, leaving the garment looking as though it’s being worn by an invisible model. This creates a clean, floating effect that allows the viewer to focus solely on the clothing. It’s a staple in fashion photography, especially for online stores, as it presents products in a visually appealing way that enhances their marketability.
Why Use the Ghost Mannequin Effect in Fashion Photography?
Fashion photography relies heavily on visuals that can capture a buyer’s attention in seconds. The Ghost Mannequin Effect offers a unique way to display clothing that is both professional and engaging. By removing the mannequin, the garment stands out, allowing its details, fit, and design to be the focal point. This not only makes the clothing look more appealing but also provides a consistent look across a brand’s product images.
How Does the Ghost Mannequin Effect Improve Product Presentation?
This effect improves product presentation by offering a clear, unobstructed view of the garment. It removes any potential distractions that a mannequin or model might introduce, allowing customers to focus solely on the product. Additionally, it allows for a more accurate representation of how the garment would look when worn, helping customers make more informed purchasing decisions.
Essential Photoshop Tools for Creating a Ghost Mannequin Effect
Adobe Photoshop is the go-to tool for creating the Ghost Mannequin Effect. Key tools include the Pen Tool for precise selections, the Clone Stamp and Healing Brush for seamless edits, and Layer Masks for non-destructive adjustments. The Liquify Tool can also be useful for ensuring the garment’s fit looks natural, while the Refine Edge Tool helps create clean, professional-looking edges.
Common Mistakes to Avoid When Starting with Ghost Mannequin Editing
One common mistake is failing to shoot multiple angles of the garment, which limits your ability to create a complete and convincing effect. Inconsistent lighting can also be an issue, as it makes the editing process more challenging. Additionally, beginners often overlook the importance of clean selections, leading to jagged edges and an unprofessional final image. Ensuring your workspace is organized and your tools are set up correctly can also prevent errors down the line.
Preparing Your Images
How to Select the Best Photos for the Ghost Mannequin Effect
Choosing the right photos is crucial for a successful Ghost Mannequin Effect. Start by selecting images that are well-lit and in focus, as these will make the editing process much smoother. Ensure the garment is properly positioned on the mannequin, with all parts visible and free from wrinkles. Multiple shots from different angles are ideal, as they provide the necessary material to create a complete and realistic effect.
Tips for Shooting Garments on a Mannequin
When photographing garments, it’s important to ensure the clothing fits the mannequin well, with no sagging or bunching. Use pins or clips to adjust the fit if necessary. Position your lighting to minimize shadows and highlight the garment’s details. Take shots from various angles, including the front, back, and sides, to give yourself plenty of material to work with during editing.
Importance of Consistent Lighting in Product Photography
Consistent lighting is key to creating a professional and polished Ghost Mannequin Effect. Uneven lighting can cause shadows and highlights that are difficult to correct in post-production. Use soft, diffused light to evenly illuminate the garment, and avoid harsh shadows that can obscure details. Consistent lighting across all your images ensures a uniform look, which is essential for creating a seamless effect.
How to Organize Your Photos Before Editing
Organizing your photos before you start editing can save you time and ensure a smoother workflow. Start by grouping your images by garment and angle. Rename your files with descriptive names, such as “front view” or “back view,” to make them easier to find. Consider creating folders for different stages of the editing process, such as “raw images” and “final edits,” to keep everything organized.
Should You Use RAW or JPEG Files for Editing?
When it comes to editing, RAW files offer more flexibility than JPEGs. RAW files retain all the data captured by your camera’s sensor, allowing for more detailed edits and better control over exposure, color balance, and contrast. JPEG files, while smaller and easier to work with, are compressed and lose some of this data, which can limit your editing options. For the best results, shoot in RAW and convert to JPEG after editing.
Setting Up Your Photoshop Workspace
How to Set Up Your Workspace for Efficient Editing
An efficient workspace is essential for a smooth editing process. Start by arranging your panels and tools in a way that suits your workflow. Place frequently used tools, like the Pen Tool and Layers panel, within easy reach. Consider using a dual-monitor setup to keep your workspace uncluttered and to make it easier to compare different stages of your edits. Saving your workspace layout ensures that you can quickly get started on future projects without needing to reorganize.
What Photoshop Tools Are Essential for This Effect?
The Ghost Mannequin Effect requires several key Photoshop tools. The Pen Tool is indispensable for making precise selections, while the Clone Stamp and Healing Brush are essential for cleaning up areas where the mannequin has been removed. Layer Masks allow for non-destructive editing, and the Refine Edge Tool is crucial for achieving clean, professional-looking edges. The Liquify Tool can also be helpful for adjusting the fit of the garment to make it look more natural.
Customizing Your Toolbar for Quick Access
Customizing your Photoshop toolbar can significantly speed up your workflow. You can add or remove tools based on your needs and rearrange them in an order that makes sense to you. Consider placing frequently used tools like the Pen Tool, Clone Stamp, and Healing Brush near the top of your toolbar for easy access. You can also create custom tool presets for different stages of your editing process, allowing you to quickly switch between setups.
Keyboard Shortcuts You Need to Know for Faster Editing
Keyboard shortcuts are a time-saver in any editing process. Familiarize yourself with essential shortcuts like “Ctrl+J” for duplicating layers, “B” for the Brush Tool, and “P” for the Pen Tool. You can also create custom shortcuts for tasks you perform frequently. These shortcuts not only speed up your workflow but also reduce the risk of repetitive strain injuries from constant mouse use.
How to Save Your Workspace for Future Projects
Saving your workspace layout in Photoshop ensures that you can easily return to a familiar setup for future projects. Once you’ve arranged your panels and tools to your liking, go to Window > Workspace > New Workspace and give it a name. This allows you to quickly switch back to your preferred layout whenever you start a new project, saving you time and effort.
Creating the Initial Selection
How to Use the Pen Tool to Create Precise Selections
The Pen Tool in Photoshop is your best friend when it comes to making precise selections, especially for intricate edges around garments. Start by zooming in on the area you want to select, and click to create anchor points along the edge of the garment. Be sure to adjust the curves between points to match the contours of the fabric. Once you’ve traced the entire outline, right-click and choose “Make Selection” to convert your path into an active selection. This method provides unmatched accuracy, ensuring clean edges that are crucial for the Ghost Mannequin Effect.
Why is the Lasso Tool Useful for Selecting Complex Areas?
The Lasso Tool is particularly handy for selecting areas that have irregular shapes or where the edges are less defined. It allows for freehand selection, giving you the flexibility to trace around tricky areas like ruffles or intricate details. For best results, use the Polygonal Lasso Tool, which lets you click to create straight-line segments, or the Magnetic Lasso Tool, which automatically snaps to edges as you trace around your subject. This tool is invaluable when dealing with complex areas where the Pen Tool might be too rigid.
Tips for Refining Your Selection Edges
Once your initial selection is made, refining the edges is key to achieving a polished final image. In Photoshop, you can use the “Select and Mask” feature to smooth, feather, or shift the edge of your selection. Pay particular attention to areas where the fabric meets the background, as this is where rough edges can ruin the illusion. Use the Refine Edge Brush Tool within the “Select and Mask” workspace to handle tricky areas like lace or hair, ensuring that your selection transitions smoothly into the background.
How to Select the Mannequin Without Losing Garment Details
Selecting the mannequin without compromising the garment’s details can be challenging. Start by using the Pen Tool or Lasso Tool to carefully trace around the garment, making sure not to cut off any important details like hems or seams. If the garment overlaps the mannequin in complex ways, consider making multiple selections and combining them later. Utilize Layer Masks to hide the mannequin while preserving the garment, allowing you to fine-tune the selection without risking loss of detail.
When Should You Use the Quick Selection Tool?
The Quick Selection Tool is ideal for areas with strong contrast between the garment and the background. It works by detecting edges as you drag the brush over your image, making it fast and efficient for selecting larger areas. However, it’s less precise than the Pen or Lasso Tools, so it’s best used for initial selections that you can refine later. Use it when you need to quickly isolate large portions of the garment, but be prepared to switch to more precise tools for the finer details.
Isolating the Garment from the Background
Why Removing the Background is Crucial for This Effect
Background removal is a fundamental step in creating the Ghost Mannequin Effect. By isolating the garment from its surroundings, you eliminate distractions and create a clean, focused image that highlights the clothing. This step is crucial for maintaining a professional appearance in your product photos, as it allows the garment to stand out against a neutral backdrop, drawing the viewer’s attention directly to the product.
How to Use the Background Eraser Tool Effectively
The Background Eraser Tool in Photoshop is a powerful tool for removing backgrounds while preserving fine details like hair or intricate lace. It works by sampling the color at the center of your brush and erasing similar colors as you drag the tool across the image. Adjust the tolerance level to control how much variation in color the tool will erase. This tool is especially effective on backgrounds with solid colors or gradients, but be careful around edges to avoid erasing parts of the garment.
Best Practices for Creating a Clean, White Background
A clean, white background is the gold standard for product photography, providing a crisp, professional look that’s perfect for e-commerce. To achieve this, use the Background Eraser Tool or the Magic Wand Tool to remove the original background, then create a new layer filled with white beneath your garment layer. Ensure that the edges of the garment blend seamlessly with the new background, using Layer Masks and the Brush Tool to refine any areas where the transition is too harsh.
How to Handle Shadows and Reflections During Isolation
Shadows and reflections can add depth and realism to your images, but they need to be handled carefully during isolation. When removing the background, try to preserve any natural shadows or reflections that fall within the garment’s outline. Use the Clone Stamp Tool or Layer Masks to clean up any remaining unwanted shadows. If necessary, create new shadows by duplicating the garment layer, filling it with black, and using Gaussian Blur and Layer Opacity adjustments to create a subtle, realistic shadow.
Advanced Tips for Perfecting Your Background Removal
For perfecting background removal, consider using advanced techniques like color range selections or channel-based masks. These methods allow for more precise control over complex areas, such as semi-transparent fabrics or intricate patterns. Additionally, refining your selection using the “Select and Mask” workspace can help you achieve smoother transitions and more natural-looking edges. Remember to zoom in and out frequently to check your work from different perspectives, ensuring that no stray pixels or rough edges detract from the final image.
Creating the Invisible Mannequin Effect
How to Remove the Mannequin from Your Image
Removing the mannequin from your image is the heart of the Ghost Mannequin Effect. After isolating the garment, the next step is to use the Pen Tool or Lasso Tool to carefully select and remove the mannequin. It’s essential to work slowly and precisely to ensure that the garment’s shape remains intact. Once the mannequin is removed, use the Clone Stamp Tool to fill in any gaps or missing areas, ensuring that the garment appears whole and natural.
What Techniques Ensure a Seamless Removal Process?
To ensure a seamless removal process, it’s important to work non-destructively. Use Layer Masks instead of erasing directly on the image, so you can easily go back and make adjustments if needed. Pay close attention to the edges of the garment, where the mannequin was removed, and use the Healing Brush Tool to blend these areas smoothly. Additionally, working in small sections and constantly reviewing your progress will help you catch any inconsistencies early on.
How to Use Layer Masks for Non-Destructive Editing
Layer Masks are a key tool for non-destructive editing, allowing you to hide or reveal parts of a layer without permanently altering the original image. To use Layer Masks effectively, first create a mask on your garment layer. Then, use a soft brush with varying opacity levels to paint on the mask, gradually revealing or hiding areas of the image. This technique is especially useful for refining edges, blending layers, and making adjustments without having to start over.
Combining Different Garment Layers for a Realistic Look
For a truly realistic Ghost Mannequin Effect, you may need to combine multiple images of the garment, such as front and back views. Start by aligning the images in Photoshop, using the Transform Tool to adjust their size and position. Then, use Layer Masks to blend the layers together, ensuring that the seams and edges match up perfectly. This technique allows you to create a more complete and three-dimensional representation of the garment, enhancing its appeal.
Tips for Maintaining Natural Garment Shape After Removal
Maintaining the natural shape of the garment is crucial to creating a convincing Ghost Mannequin Effect. After removing the mannequin, use the Liquify Tool to adjust any areas that appear distorted or misshapen. Focus on preserving the garment’s original contours, such as the curve of a collar or the drape of a sleeve. Additionally, consider using the Warp Tool for more precise adjustments, allowing you to fine-tune the garment’s shape without compromising its overall appearance.
Professional Ghost Mannequin Service
Blending the Garment Parts
How to Merge Front and Back Photos for a Unified Image
Merging front and back photos of a garment is essential for creating a unified Ghost Mannequin Effect. Start by aligning the images in Photoshop, ensuring that the seams and edges match up perfectly. Use Layer Masks to blend the two images together, gradually revealing or hiding parts of each layer until they seamlessly merge. Pay close attention to areas like the neckline and shoulders, where the front and back views must align perfectly for a realistic effect.
What is the Liquify Tool and How Does It Help in Blending?
The Liquify Tool in Photoshop is a powerful tool for adjusting the shape and fit of garments in your images. It allows you to push, pull, and warp parts of the image, helping to blend the front and back photos together more seamlessly. Use the Forward Warp Tool within the Liquify workspace to gently nudge areas into place, ensuring that the garment maintains its natural shape and proportions. This tool is especially useful for correcting any distortions that occurred during the removal of the mannequin.
How to Ensure Symmetry in Your Final Image
Symmetry is key to a professional-looking Ghost Mannequin Effect. To ensure your final image is symmetrical, use Photoshop’s Ruler Tool to check the alignment of key elements, such as the neckline, sleeves, and hem. You can also use the Transform Tool to adjust the size and position of different parts of the garment, ensuring they align perfectly. If necessary, duplicate one side of the garment and flip it horizontally to create a mirror image, then blend the two sides together using Layer Masks.
Tips for Blending Collars and Sleeves Smoothly
Blending collars and sleeves smoothly can be challenging, but it’s essential for creating a realistic Ghost Mannequin Effect. Start by carefully aligning the front and back views of the collar or sleeve, using the Transform Tool to adjust their size and position if necessary. Then, use Layer Masks and a soft brush to blend the edges together, gradually revealing or hiding parts of each layer until the transition is seamless. Pay attention to the natural folds and curves of the fabric, and use the Liquify Tool to adjust the shape if needed.
How to Use the Clone Stamp Tool for Flawless Blending
The Clone Stamp Tool is an invaluable tool for flawless blending, especially in areas where the garment overlaps or where the edges don’t quite match up. To use the Clone Stamp Tool, select a source area by holding down the Alt key and clicking, then paint over the area you want to blend. Use a soft brush with low opacity for gradual blending, and be sure to sample from different areas to avoid creating repeating patterns. This technique is particularly useful for blending seams, hems, and other intricate details.
Refining the Details
How to Adjust Colors and Tones for Consistency
Consistent colors and tones are key to a polished final image. Start by using the Curves or Levels adjustment layers in Photoshop to match the brightness and contrast of different parts of the garment. If the colors appear uneven, use the Hue/Saturation adjustment layer to fine-tune the hues and saturations across the entire image. Pay close attention to areas where the garment was blended or where the mannequin was removed, as these areas may require extra adjustment to match the rest of the image.
Best Practices for Smoothing Out Wrinkles and Imperfections
Smoothing out wrinkles and imperfections is essential for creating a professional-looking product photo. Use the Healing Brush Tool or the Patch Tool in Photoshop to remove small imperfections, such as wrinkles, blemishes, or dust spots. For larger areas, consider using the Clone Stamp Tool or the Liquify Tool to smooth out the fabric and create a more polished appearance. Be careful not to overdo it, as some natural texture and wrinkles can add realism to the image.
How to Sharpen the Image for a Professional Finish
Sharpening your image is the final step in creating a crisp, professional finish. In Photoshop, use the Unsharp Mask or the Smart Sharpen filter to enhance the details of the garment. Be careful not to over-sharpen, as this can create unwanted artifacts or make the image look unnatural. Adjust the Amount, Radius, and Threshold settings to find the right balance, and consider applying sharpening selectively to key areas like seams, edges, and textures.
Tips for Enhancing Fabric Texture
Enhancing the fabric texture can make your garment stand out and look more realistic. Use the High Pass filter in Photoshop to bring out the details in the fabric. First, duplicate your image layer, then apply the High Pass filter (found under Filter > Other > High Pass) and set the blending mode to Overlay or Soft Light. Adjust the opacity of the layer to control the intensity of the effect. This technique adds depth and dimension to the fabric, making it look more tactile and appealing.
How to Add Depth and Dimension to the Garment
Adding depth and dimension to the garment is crucial for creating a three-dimensional look. Use Dodge and Burn tools in Photoshop to selectively lighten and darken areas of the garment, enhancing its contours and folds. Focus on areas where the fabric naturally catches light or creates shadows, such as around seams, pleats, and folds. This technique not only adds realism to the image but also makes the garment appear more dynamic and visually interesting.
Perfecting the Edges
Why are Clean Edges Important in Ghost Mannequin Photography?
Clean edges are crucial in ghost mannequin photography because they enhance the overall professionalism and quality of the image. Sharp, precise edges ensure that the garment stands out clearly against the background, making it more appealing to potential buyers. They also help maintain the integrity of the garment’s shape, providing an accurate representation of the product.
How to Use the Refine Edge Tool for Precise Edges
The Refine Edge Tool in Photoshop is essential for achieving precise edges. After making your initial selection, go to Select > Select and Mask, and use the Refine Edge Brush Tool to smooth and perfect your edges. Adjust the sliders for Smooth, Feather, Contrast, and Shift Edge to fine-tune the selection. This tool is particularly useful for handling intricate areas like lace or frayed fabric edges.
Tips for Avoiding Jagged Edges in Your Final Image
To avoid jagged edges in your final image, always zoom in and use a combination of the Pen Tool and Refine Edge Tool for precise selections. Additionally, ensure that your selection edges are smooth by using anti-aliasing options and feathering. Avoid excessive sharpening, as this can create harsh, jagged lines. Use Layer Masks to gradually blend edges, ensuring a seamless transition.
How to Deal with Complex Edge Areas Like Laces and Ribbons
Complex edge areas like laces and ribbons require extra attention. Use the Refine Edge Tool with a small brush size to carefully trace around these intricate details. You can also use the Pen Tool for more control, especially when dealing with curves and fine edges. Adjust the feather and contrast settings to ensure that the selection captures the delicate details without losing sharpness.
Techniques for Smoothing Out Difficult Edges
For smoothing out difficult edges, use the Smudge Tool in Photoshop with a low strength setting to gently blend any rough areas. Additionally, applying a slight Gaussian Blur to the edge of your selection can help create a softer, more natural transition. Use the Healing Brush Tool to clean up any inconsistencies along the edge, ensuring a smooth, professional finish.
Adding the Neck, Sleeves, and Inner Parts
How to Create the Inner Neck Part of the Garment
Creating the inner neck part of the garment involves using images of the garment laid flat or turned inside out. Align the inner neck part with the main garment image in Photoshop, then use Layer Masks to blend it seamlessly. Adjust the lighting and shadows to match the overall image, ensuring a realistic appearance.
Techniques for Adding Realistic Sleeves to Your Image
To add realistic sleeves, photograph the sleeves separately, ensuring they are well-lit and positioned correctly. In Photoshop, align the sleeve images with the main garment. Use Layer Masks and the Liquify Tool to adjust the fit and shape of the sleeves, blending them naturally with the garment. Ensure the fabric texture and lighting match for a cohesive look.
How to Add Inner Labels or Tags for a Complete Look
Adding inner labels or tags enhances the realism and completeness of the image. Photograph the labels separately, then place them within the garment using Photoshop. Use the Transform Tool to adjust their size and angle, ensuring they fit naturally. Apply slight shadows and highlights to match the garment’s fabric, enhancing their integration.
Tips for Ensuring Proportion and Alignment
Ensuring proportion and alignment involves using Photoshop’s guides and rulers. Align key elements like the neckline, sleeves, and hem with these guides. Use the Transform Tool to adjust the size and positioning of different parts, maintaining symmetry and proportion. Constantly compare the combined image with the original garment to ensure accuracy.
How to Blend Added Parts Seamlessly with the Rest of the Garment
Blending added parts seamlessly requires careful use of Layer Masks and the Brush Tool. Gradually paint on the mask to hide or reveal parts of the added elements, ensuring a smooth transition. Match the lighting, shadows, and colors of the added parts to the main garment using adjustment layers like Curves, Levels, and Color Balance.
Final Touches and Quality Checks
How to Do a Final Review of Your Ghost Mannequin Image
A final review involves zooming in and out to check for any inconsistencies or errors. Examine the edges, shadows, and overall alignment. Ensure that all elements, including added parts, blend seamlessly. Look for any stray pixels, rough edges, or color mismatches, and correct them using appropriate tools.
Tips for Spotting and Fixing Any Overlooked Details
To spot overlooked details, step away from the image and return with fresh eyes. Use Photoshop’s Zoom Tool to inspect the image at different magnifications. Compare the image to the original garment and make any necessary adjustments. Use the Healing Brush Tool and Clone Stamp Tool to fix minor imperfections.
How to Compare Your Work with Professional Standards
Compare your work with professional standards by examining high-quality ghost mannequin images from top brands. Pay attention to the precision of edges, the realism of shadows and highlights, and the overall presentation. Strive to match or exceed these standards in your work, ensuring your images are competitive.
How to Save Different Versions for Different Uses
Save different versions of your image for various uses by creating multiple files with different resolutions and formats. Save a high-resolution version for print, a web-optimized version for online use, and a layered PSD file for future edits. Use descriptive filenames to keep your files organized and easily accessible.
What to Consider When Exporting Your Final Image
When exporting your final image, consider the intended use. Choose the appropriate file format (e.g., JPEG for web, TIFF for print) and resolution. Adjust the compression settings to balance image quality and file size. Ensure the color profile matches the intended output, such as sRGB for web use or CMYK for print.
Saving and Exporting Your Work
How to Choose the Right File Format for Your Image
Choose the right file format based on the intended use. JPEG is suitable for web use due to its balance of quality and file size. TIFF or PNG is ideal for print, offering high-quality lossless compression. PSD is useful for retaining layers and editability. Consider the requirements of your clients or platform when selecting the format.
Tips for Maintaining Image Quality After Exporting
Maintain image quality after exporting by using the highest possible resolution and avoiding excessive compression. Use the “Save for Web” option in Photoshop to optimize images for online use without sacrificing quality. Always keep an uncompressed version of your image as a master file for future edits or re-exports.
How to Optimize Your Image for Web Use
Optimize your image for web use by resizing it to the appropriate dimensions, usually 72 DPI for web resolution. Use the “Save for Web” option in Photoshop to reduce the file size while maintaining quality. Choose JPEG or PNG format, depending on the image content, and adjust the compression settings to balance quality and loading speed.
What to Consider When Saving Files for Clients
When saving files for clients, consider their specific requirements. Provide multiple formats (JPEG, PNG, TIFF) and resolutions (high-res for print, low-res for web). Ensure the color profile matches their needs (sRGB for web, CMYK for print). Include a layered PSD file if they may need to make future edits. Use clear, descriptive filenames.
How to Organize and Store Your Project Files
Organize and store your project files systematically. Create folders for each project, with subfolders for raw images, edited files, and final exports. Use consistent and descriptive filenames for easy retrieval. Back up your files regularly to multiple locations, such as an external hard drive and a cloud storage service, to prevent data loss.
Common Issues and Troubleshooting
What to Do if Your Selection Isn’t Perfect?
If your selection isn’t perfect, use the Refine Edge Tool or Select and Mask workspace in Photoshop to fine-tune it. Adjust the smoothness, feather, and contrast to improve the edges. Use Layer Masks to gradually blend any rough areas. Zoom in and manually correct imperfections with the Brush Tool.
How to Fix Blurry or Distorted Garments
To fix blurry or distorted garments, use the Sharpen Tool or apply the Unsharp Mask filter in Photoshop. For distortions, use the Liquify Tool to adjust the shape and fit of the garment. Ensure the resolution is high enough to support these adjustments without losing quality. Re-align and re-size elements if necessary.
Troubleshooting Color and Lighting Inconsistencies
For color and lighting inconsistencies, use adjustment layers like Curves, Levels, and Color Balance in Photoshop. Match the color tones and lighting across different parts of the garment. Use the Dodge and Burn tools to enhance highlights and shadows, creating a consistent and natural look throughout the image.
How to Correct Issues with Garment Symmetry
Correct issues with garment symmetry by using the Ruler Tool to check alignment and proportions. Use the Transform Tool to adjust size and positioning. Duplicate and flip one side of the garment if necessary, blending it with Layer Masks. Ensure that key elements like the neckline and hemline are symmetrical.
Tips for Recovering from Mistakes Without Starting Over
Recover from mistakes without starting over by using non-destructive editing techniques. Work with adjustment layers, Layer Masks, and smart objects to preserve the original image. Regularly save versions of your work, allowing you to revert to earlier stages if needed. Use the History panel in Photoshop to undo specific actions.
Advanced Techniques and Enhancements
How to Create a 3D Ghost Mannequin Effect
To create a 3D Ghost Mannequin Effect, combine multiple images of the garment from different angles. Align and blend these images in Photoshop using Layer Masks and the Transform Tool. Add shadows and highlights to enhance the three-dimensional appearance. Use the Warp Tool to adjust the shape and fit for a realistic look.
Tips for Adding Shadows and Reflections for Realism
Add shadows and reflections to enhance realism by duplicating the garment layer and flipping it vertically to create a reflection. Adjust the opacity and apply a Gaussian Blur to soften the reflection. Create shadows by painting with a soft brush on a new layer beneath the garment, then adjust the opacity and blend mode for a natural effect.
How to Create Multiple Angles of the Same Garment
Create multiple angles of the same garment by photographing it from different perspectives. In Photoshop, align and blend these images, maintaining consistency in color and lighting. Use the Warp and Liquify tools to adjust the fit and shape of the garment, ensuring each angle looks natural and cohesive.
Techniques for Combining Ghost Mannequin Effect with Other Effects
Combine the Ghost Mannequin Effect with other effects like reflections, shadows, or 3D effects to enhance the final image. Use Layer Masks and blending modes in Photoshop to integrate these effects seamlessly. Experiment with different techniques to create unique and visually appealing product images that stand out.
How to Experiment with Creative Edits for Unique Results
Experiment with creative edits by playing with color grading, textures, or compositing techniques in Photoshop. Use blending modes, filters, and adjustment layers to achieve unique effects. Try combining the Ghost Mannequin Effect with other Photoshop techniques like double exposure or surreal edits to create striking and innovative images.
Conclusion
Recap: Key Steps to Mastering the Ghost Mannequin Effect
Mastering the Ghost Mannequin Effect involves several key steps: creating accurate selections, isolating the garment from the background, removing the mannequin, blending the garment parts seamlessly, refining details, and perfecting the edges. By following these steps and using Photoshop’s tools effectively, you can achieve professional-quality images.
Why Practice Makes Perfect: Building Your Skills Over Time
Practice is essential to mastering the Ghost Mannequin Effect. Each project offers a chance to refine your skills and experiment with different techniques. The more you practice, the more comfortable and proficient you will become with the tools and processes, leading to faster and more polished results.
How the Ghost Mannequin Effect Can Elevate Your Photography Business
The Ghost Mannequin Effect can elevate your photography business by providing clients with high-quality, professional images that enhance their product presentations. This effect is particularly valuable in the fashion industry, where clean, detailed images of garments are crucial for online sales. Offering this service can attract new clients and set your business apart.
Next Steps: Exploring More Photoshop Techniques
Once you’ve mastered the Ghost Mannequin Effect, consider exploring other Photoshop techniques to expand your skillset. Learn about advanced retouching, compositing, and color grading to offer a broader range of services. Continuously seek out new tutorials, workshops, and resources to keep your skills sharp and up-to-date.
Resources for Continued Learning and Improvement
To continue learning and improving, explore online resources like Adobe’s tutorials, YouTube channels focused on Photoshop, and photography blogs. Join online communities where you can share your work, ask questions, and learn from others. Consider enrolling in advanced Photoshop courses or attending workshops to further enhance your skills.

Photo Editing for TikTok Shop Sellers: What Works in 2026
📂 Categories 🛒 Ecommerce Business 📸 E-commerce Photo Tips 🖼️ Platform Image Req. 📦 Amazon…

“Why Your Ecommerce Store Needs Professional Photo Editing”
📂 Categories 🛒 Ecommerce Business 📸 E-commerce Photo Tips 🖼️ Platform Image Req. 📦 Amazon…
eBay Product Photo Requirements 2026: The Complete Seller’s Checklist
📂 Categories 🛒 Ecommerce Business 📸 E-commerce Photo Tips 🖼️ Platform Image Req. 📦 Amazon…

Drop Shipping Product Photos: How to Stand Out When Competitors Use the Same Images
📂 Categories 🛒 Ecommerce Business 📸 E-commerce Photo Tips 🖼️ Platform Image Req. 📦 Amazon…

AI vs Manual Photo Editing for Ecommerce: Which Delivers Better ROI?
📂 Categories 🛒 Ecommerce Business 📸 E-commerce Photo Tips 🖼️ Platform Image Req. 📦 Amazon…
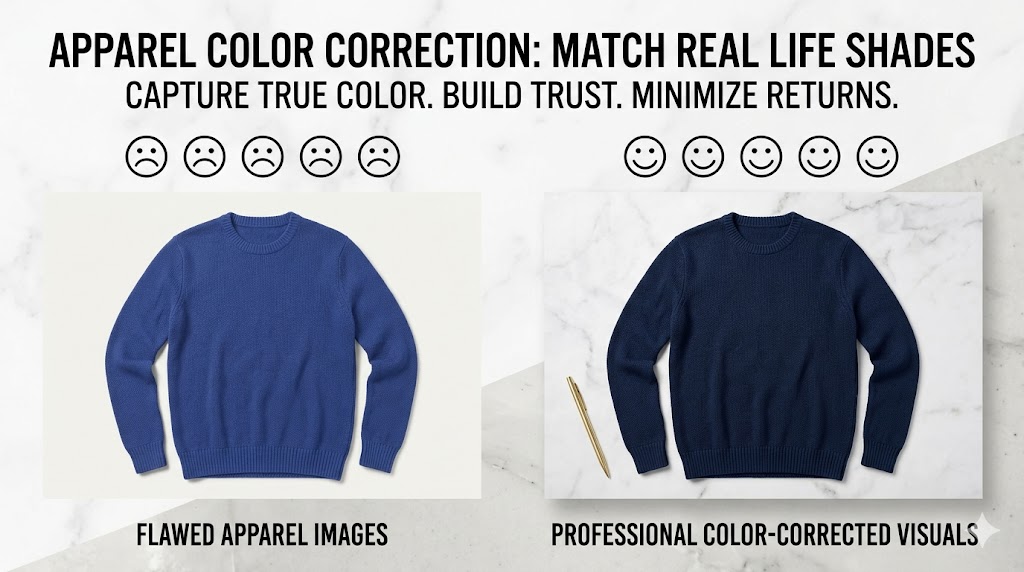
Color Correction for Apparel Photos: Match What Customers See in Real Life
📂 Categories 🛒 Ecommerce Business 📸 E-commerce Photo Tips 🖼️ Platform Image Req. 📦 Amazon…