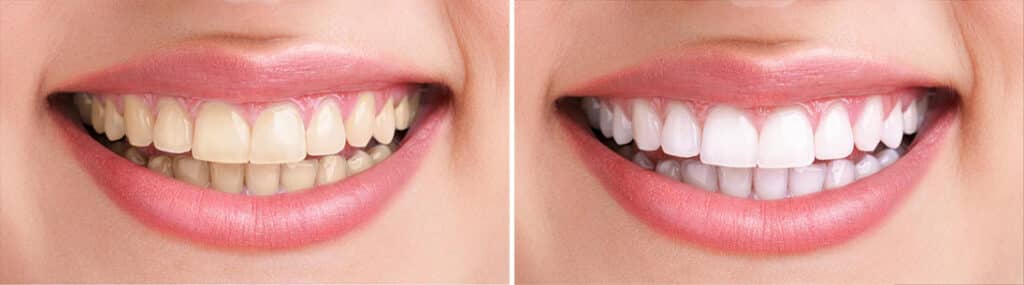
How to Whiten Teeth in Photoshop
In this digital age, where image perfection is highly sought after, Photoshop has become an essential tool for enhancing photographs. One common area of focus when retouching portraits is the teeth. Whether you’re a professional photographer, a graphic designer, or someone who wants to improve their own photos, learning how to whiten teeth in Photoshop can make a significant difference. This article will guide you through the process step by step, providing valuable tips for achieving natural-looking results.
Introduction
Having a bright and confident smile can leave a lasting impression. However, factors like aging, lifestyle choices, and certain foods and beverages can cause teeth to become stained or yellowed over time. While professional teeth whitening treatments exist, they can be expensive and time-consuming. Fortunately, with the power of Photoshop, you can achieve similar results from the comfort of your own computer.
Importance of Teeth Whitening
Teeth whitening is a popular cosmetic procedure that helps individuals restore the natural whiteness of their teeth. It enhances the overall appearance of a person’s smile, boosts self-confidence, and can even make individuals look younger. By learning how to whiten teeth in Photoshop, you can transform dull or discolored teeth into a vibrant and appealing smile.
Understanding Photoshop for Teeth Whitening
Before diving into the teeth whitening process, it’s important to familiarize yourself with the basic tools and features of Photoshop. Adobe Photoshop is a powerful image editing software that provides various tools and adjustments to manipulate photographs. Understanding the fundamentals of Photoshop will make it easier to achieve the desired results.
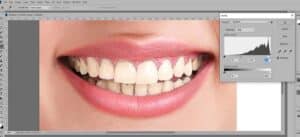
Step 1: Opening the Image in Photoshop
To begin the teeth whitening process, open your desired image in Photoshop. Use the “File” menu and select “Open” to locate and load the image onto the software’s workspace. Ensure that you’re working with a high-resolution image for better accuracy and detail.
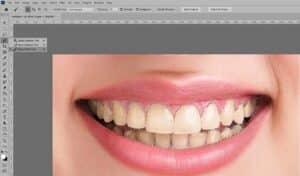
Step 2: Making a Selection
Next, create a selection around the teeth to isolate them for the whitening process. There are multiple ways to make selections in Photoshop, such as using the “Quick Selection Tool” or the “Lasso Tool.” Carefully trace around the teeth, refining the selection as needed to capture the entire area accurately.
Step 3: Adjusting Levels and Curves
Once the teeth are selected, navigate to the “Image” menu and choose “Adjustments.” From the options presented, select “Levels” or “Curves.” These adjustments will help enhance the contrast and brightness of the teeth. Make subtle adjustments to brighten the selected area while maintaining a natural appearance.
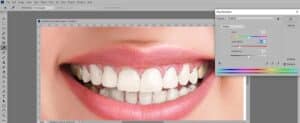
Step 4: Applying a Hue/Saturation Adjustment Layer
To further enhance the whiteness of the teeth, add a “Hue/Saturation” adjustment layer. Go to the “Layer” menu and select “New Adjustment Layer,” then choose “Hue/Saturation.” Increase the saturation and adjust the hue to remove any lingering stains or discoloration. Be cautious not to oversaturate the teeth, as it can result in an unnatural look. Aim for a subtle enhancement that blends seamlessly with the rest of the image.
Step 5: Using the Dodge and Burn Tools
To refine the whitening effect and add dimension to the teeth, utilize the “Dodge” and “Burn” tools. The Dodge tool lightens specific areas, while the Burn tool darkens them. Select the Dodge tool and set a low exposure value. Gently brush over the teeth to lighten any remaining shadows or dull areas. Switch to the Burn tool if there are any excessively bright spots, and carefully darken them for a balanced appearance.
Step 6: Smoothing and Refining the Edges
To ensure a natural-looking result, it’s essential to refine the edges of the whitened teeth. Select the “Smudge Tool” or the “Blur Tool” and use a soft brush to gently blend the edges of the teeth with the surrounding areas. This step helps eliminate any harsh transitions and creates a seamless integration.
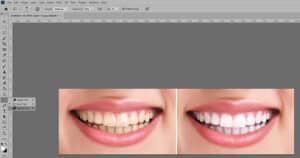
Step 7: Final Touches and Fine-Tuning
Take a step back and assess the overall result. If needed, make additional adjustments to achieve the desired level of whiteness and realism. Pay attention to the image as a whole, ensuring that the whitened teeth complement the subject’s facial features and the overall composition. Fine-tune the opacity of adjustment layers and make any necessary refinements until you’re satisfied with the outcome.
Tips for Natural-Looking Results
-
Avoid excessive whitening: It’s important to maintain a balance between whiteness and naturalness. Teeth that are excessively white can appear unrealistic. Aim for a natural shade that complements the individual’s features and the overall image.
-
Consider individual tooth variations: Not all teeth have the same shade or level of whiteness. To achieve a realistic look, observe the subject’s teeth closely and mimic the variations in color and brightness.
-
Pay attention to lighting: Take into account the lighting conditions of the original image when adjusting the teeth. Shadows and highlights should align with the rest of the photograph to maintain a cohesive and believable result.
Enhancing the Overall Smile
While teeth whitening is a significant aspect, there are other ways to enhance the overall smile in Photoshop. These include:
-
Fixing alignment: Use the “Liquify” tool to subtly adjust the alignment of the teeth if necessary. Be cautious not to overdo it, as it can lead to an unnatural appearance.
-
Smoothing lips: Utilize the “Clone Stamp” or “Healing Brush” tool to smooth out any imperfections or wrinkles on the lips, contributing to a more polished smile.
-
Brightening the eyes: Enhancing the brightness and clarity of the eyes can further enhance the overall impact of a smile. Use selective adjustments to achieve this effect.
Saving and Exporting the Edited Image
Once you’re satisfied with the teeth whitening and overall smile enhancements, it’s time to save and export the edited image. Choose the appropriate file format and resolution based on your intended use. Consider preserving the original image separately to maintain a non-destructive workflow.
Conclusion
Photoshop offers powerful tools and techniques to whiten teeth and enhance smiles in photographs. By following the step-by-step process outlined in this article and keeping in mind the tips for achieving natural-looking results, you can transform dull or discolored teeth into a bright and confident smile. Remember to exercise restraint and maintain the individual’s unique features to ensure a realistic outcome.
FAQs
Q1: Can I whiten teeth in Photoshop without making a selection?
A1: While it’s possible to apply general adjustments to the entire image, creating a selection around the teeth allows for more precise control over the whitening process. It ensures that only the teeth are affected, preventing unintended changes to other areas of the image.
Q2: Is teeth whitening in Photoshop difficult to learn?
A2: Photoshop can be a complex software, but learning how to whiten teeth specifically is relatively straightforward. With practice and familiarity with the tools and adjustments involved, you can quickly master the process.
Q3: Can I achieve natural-looking results with teeth whitening in Photoshop?
A3: Yes, it is possible to achieve natural-looking results with teeth whitening in Photoshop. The key is to exercise subtlety and avoid over-whitening. Pay attention to details like individual tooth variations, lighting, and overall harmony with the rest of the image.
Q4: Are there alternative software options for teeth whitening?
A4: While Photoshop is a popular choice, there are alternative software options available for teeth whitening, such as GIMP, Lightroom, or various online photo editors. The techniques and principles discussed in this article can generally be applied to these software as well.
Q5: Can I whiten severely stained teeth in Photoshop?
A5: Photoshop can help improve the appearance of stained teeth, but its effectiveness depends on the severity of the staining. In cases of severe discoloration, professional dental treatment may be required to achieve the desired results.