Introduction
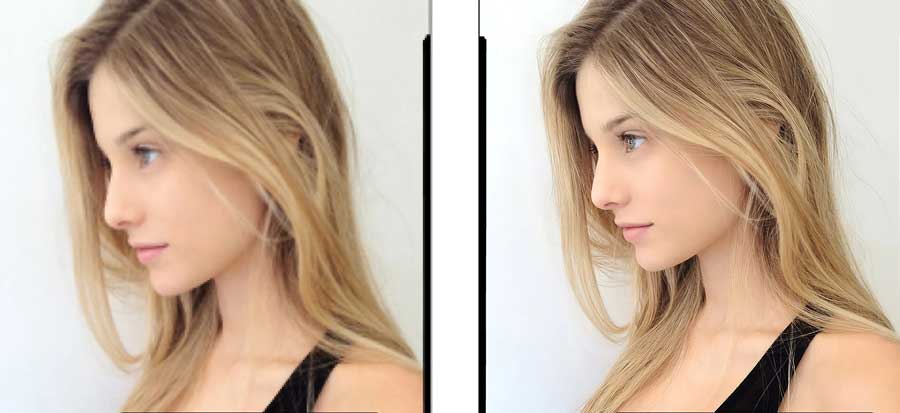
Uh oh, just downloaded your photos and realized they’re plagued by blur? Don’t toss them in the digital bin just yet! With a few quick and easy tricks in Photoshop, you can breathe new life into those blurry photos and have them looking crisp and clear in a mere two minutes. That’s right, say goodbye to blurry disasters and hello to stunning, sharp images!
Understanding Blur! How to Fix Blurry Photos in Photoshop
But before we dive into sharpening techniques, let’s take a moment to understand the culprit behind the blur. Not all blur is created equal, folks. There are different types, each with its own cause.
- Motion blur: This occurs when either your camera or your subject moves during the exposure. Imagine capturing a playful pup mid-dash – you might end up with a charmingly blurred blur due to the swift movement.
- Camera shake: This sneaky blur arises from unsteady hands or a slow shutter speed. Maybe you were a little excited at that concert or the lighting was less than ideal, forcing you to use a slower shutter speed. The result? A slightly shaky photo that needs some TLC.
- Out-of-focus blur: This one’s pretty straightforward. Your camera simply wasn’t focused on the right spot. Perhaps you were manually focusing and missed the mark, or maybe autofocus malfunctioned. Whatever the reason, the key element of your photo appears hazy and indistinct.
Before You Sharpen: Assessing the Damage
Can blurry photos always be fixed? Unfortunately, the answer isn’t always a resounding yes. But here’s the good news: with a quick assessment, you can determine if your photo is a salvageable candidate or destined for the digital graveyard.
As a general rule, if the blur is mild and the photo still retains some detail, you’re in luck! Sharpening techniques can work their magic and bring back some crispness. However, if the blur is severe and the image lacks significant detail, sharpening might not achieve the desired results. It’s like trying to polish a pebble into a diamond – sometimes, it’s better to accept certain limitations.
Sharpening to the Rescue!
Now that we’ve identified our blurry foe, let’s unleash the sharpening superhero! Sharpening essentially enhances the contrast between edges in a photo, making details appear more defined and bringing an overall sense of crispness. It’s like giving your photo a visual pick-me-up.
The Sharpen filter in Photoshop serves as our trusty sharpening tool. It offers a trio of controls that give you precise control over the sharpening process:
- Amount: This knob determines the intensity of the sharpening effect. A gentle touch works well for mild blur, while a more robust application might be necessary for more severe cases.
- Radius: This setting defines the area affected by the sharpening. A smaller radius focuses on sharpening finer details, while a larger radius tackles broader edges. Think of it like an adjustable paintbrush – you control how much of the image gets the sharpening treatment.
- Reduce noise (optional): Sharpening can sometimes introduce unwanted noise into your photo, which appears as grainy speckles. This optional checkbox helps mitigate noise while sharpening, keeping your image looking clean and polished.
Sharpening Filter in Action: A Step-by-Step Guide
Alright, with our knowledge of sharpening weapons in hand, let’s put theory into practice! Here’s a step-by-step guide to using the Sharpen filter:
- Open your blurry photo in Photoshop. Welcome, blurry friend, to your transformation zone!
- Navigate to the Sharpen filter. There are a couple of ways to get there: you can either go through Filter > Sharpen > Sharpen, or take the shortcut route by hitting Alt+Shift+M (on Windows) or Option+Shift+M (on Mac).
- Now comes the fun part: adjusting the Sharpen filter controls! Start with the Amount slider. For mild blur, a value around 100% might suffice. For more pronounced blur, you can gradually increase the Amount until the details start to pop. Remember, moderation is key – overdoing it can create an unnaturally harsh look.
- Next up, the Radius. Experiment with this setting to see how it affects your image. A radius of 1-2 pixels works well for sharpening fine details like eyes or textures. For broader edges, you can increase the radius to 3-5 pixels.
- Don’t forget the optional noise reduction checkbox! If you see any unwanted grain creeping in after adjusting the Amount and Radius, tick this box and adjust the slider until the noise is minimized without compromising sharpness.
- The beauty of Photoshop is the ability to preview your edits in real-time. Use the zoom tool to inspect different
areas of your photo and ensure the sharpening enhances details without creating halos (unnatural light edges) or excessive noise. 7. Once you’re happy with the results, click “OK” to apply the Sharpen filter. Witness the magic unfold as your blurry photo transforms into a sharper, crisper image!
Sharpening Beyond the Basics: Advanced Techniques
The Sharpen filter is a fantastic tool, but for those seeking more control or specific effects, Photoshop offers some advanced sharpening techniques:
- Unsharp Mask: This filter provides more granular control over the sharpening process. It allows you to define the amount, radius, and threshold (the level of contrast difference considered for sharpening) independently. Think of it as a sharpening toolbox with all the bells and whistles for the sharpening enthusiast.
- Using layers for non-destructive sharpening: Here’s a pro tip! By applying the Sharpen filter to a duplicate layer of your image, you can make adjustments without altering the original photo. This non-destructive editing approach allows you to experiment freely and revert to the original if needed.
- Sharpening for specific details: Not all photos require uniform sharpening. You can tailor your sharpening approach to target specific areas. For instance, sharpening portraits might focus on enhancing eye definition and skin texture. Conversely, sharpening landscapes might prioritize sharpening distant mountains or architectural details.
Going Beyond Sharpening: Alternative Blur Fixes
While sharpening is a powerful tool, it’s not a one-size-fits-all solution. Photoshop offers other blur-fixing options for specific scenarios:
- Smart Blur: This intelligent filter can selectively blur backgrounds while keeping your foreground subject sharp. It’s perfect for creating a dreamy bokeh effect or emphasizing your main focal point.
- Shake Reduction Filter: Battling camera shake blur? This filter analyzes your photo and attempts to counteract the blurriness caused by unsteady hands. It’s like a virtual image stabilization tool applied after the fact.
- Field Blur: Want to add a touch of artistic blur and depth to your photos? The Field Blur filter lets you define a focal point and blur the foreground or background accordingly. It’s a great way to create a sense of dimension and draw the viewer’s eye to your main subject.
Saving Your Sharpened Masterpiece
Now that your blurry photo has been transformed into a sharp masterpiece, it’s time to save it for posterity (or at least share it on social media!). When exporting your sharpened photo, consider these points:
- Choosing the right format: Depending on your usage, you can choose between JPEG (great for web and social media sharing) or TIFF (preferred for high-quality prints).
- Quality settings: Adjust the quality slider to strike a balance between file size and image quality. A higher quality setting will result in a larger file size but preserve more image detail.
Remember, it’s always a good practice to keep a copy of your original photo before applying any edits. This way, you can always revert to the original if needed.
Conclusion
So there you have it! With these sharpening techniques and a dash of Photoshop know-how, you’ve conquered blurry photos and unlocked the potential for stunningly sharp images. Remember, practice makes perfect, so keep experimenting and sharpening your Photoshop skills. You’ll be amazed at the creative possibilities that await when you can fix blurry photos and bring your artistic vision to life!
And as a bonus tip, remember that sharpening isn’t a one-size-fits-all approach. Experiment with different techniques and settings depending on the type of photo you’re working with – portraits, landscapes, action shots – each might require a slightly different sharpening strategy. Happy sharpening!

Photo Editing for TikTok Shop Sellers: What Works in 2026
📂 Categories 🛒 Ecommerce Business 📸 E-commerce Photo Tips 🖼️ Platform Image Req. 📦 Amazon…

“Why Your Ecommerce Store Needs Professional Photo Editing”
📂 Categories 🛒 Ecommerce Business 📸 E-commerce Photo Tips 🖼️ Platform Image Req. 📦 Amazon…

eBay Product Photo Requirements 2026: The Complete Seller’s Checklist
📂 Categories 🛒 Ecommerce Business 📸 E-commerce Photo Tips 🖼️ Platform Image Req. 📦 Amazon…

Drop Shipping Product Photos: How to Stand Out When Competitors Use the Same Images
📂 Categories 🛒 Ecommerce Business 📸 E-commerce Photo Tips 🖼️ Platform Image Req. 📦 Amazon…

AI vs Manual Photo Editing for Ecommerce: Which Delivers Better ROI?
📂 Categories 🛒 Ecommerce Business 📸 E-commerce Photo Tips 🖼️ Platform Image Req. 📦 Amazon…
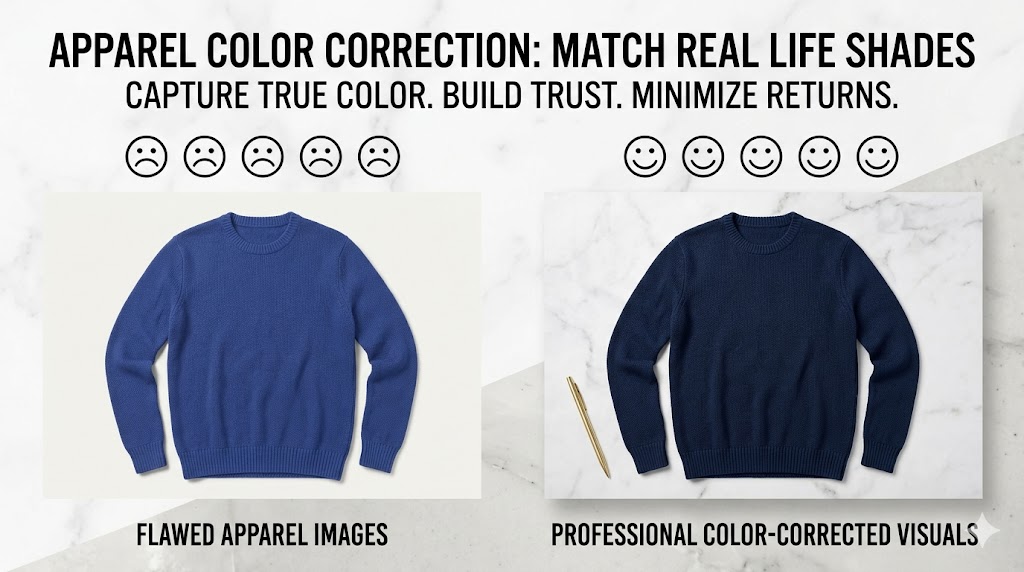
Color Correction for Apparel Photos: Match What Customers See in Real Life
📂 Categories 🛒 Ecommerce Business 📸 E-commerce Photo Tips 🖼️ Platform Image Req. 📦 Amazon…