
Mastering the Art of Ecommerce Photography: A Comprehensive Guide
Introduction
Why Ecommerce Photography is Essential for Online Success
Ecommerce photography is the foundation of the success of an eCommerce strategy. In a world of digital technology, where customers can’t physically experience or touch an item, images serve as the main method of communicating the product’s features, quality and worth. Quality e-commerce photography:
- Improves customer satisfaction by giving customers a visual representation of the products.
- Reduces returns on products by accurately capturing the appearance and feel of the product.
- Improves the image of your brand and professionalism.
- Improves trust, making customers feel more comfortable buying.
- The impact of the customer’s purchase decisions is significant by influencing their buying decisions through visuals.
The Growing Demand for High-Quality Visuals in Online Retail
As more companies move into online marketplaces, the need for striking images is growing. Consumers today expect polished, professional photos of their products which allow them to evaluate the products easily and with confidence. The need for high-quality images is not a luxury anymore, they are an absolute requirement.
- Sales on online stores are heavily dependent on the quality of images, particularly for tech, fashion and lifestyle items.
- With the increasing competition, brands need to invest in photography to distinguish their brands.
- The average customer will decide to purchase within minutes, which means that images need to be captivating instantly.
- Online marketplaces such as Amazon have requirements for sellers to adhere to strict guidelines regarding image, which is pushing the need to set higher standards.
- Brands that invest in top photography experience higher conversion rates and satisfaction of customers.
Understanding Ecommerce Photography
Defining Ecommerce Photography in the Digital Age
Ecommerce photography is the type of photography that is designed to showcase items for digital platforms like websites, online marketplaces or social networks. It is the process of making a visual story that highlights the product’s attributes but also creates the emotions that are the reason for buying.
- Highlights the clarity of the product and its details providing customers with the feeling of a “virtual touch.”
- Utilizes technological precision to achieve a balance between color accuracy and aesthetics of the product.
- Utilizes lighting techniques to minimize reflections and increase texture.
- The focus is in creating pictures that have the integrity across different platforms and devices.
- Forms a brand’s image by ensuring consistent, high-quality images.
How Ecommerce Photography differs from traditional Product Photography
While both kinds of photography concentrate on the display of products however, eCommerce photography is unique in its needs. Contrary to traditional photography of products that may also allow the freedom to create advertisements or billboards, ecommerce photography can be practical and artistic.
- Images for eCommerce are usually smaller in size, focusing on the product’s details above the surrounding.
- Needs optimization to improve web performance and requires smaller size files without compromising quality.
- Need to account for different screen resolutions, while ensuring uniform display across all devices.
- Poses specific problems using angles and lighting to ensure the details are clear even on smaller screens.
- Most of the time, there are more than one image per item providing shoppers with an all-round view.
The Role of Ecommerce Photography in Consumer Decision-Making
How Images Influence Buying Behavior
Images can have a huge impact on the behavior of consumers, particularly on the internet. Without physical interactions, consumers rely heavily on images for making informed choices.
- High-quality images enhance the perceived value.
- Detailled shots ease hesitation by providing transparency.
- Multiple angles offer a feeling of trust and honesty.
- Images of life help customers imagine how the product can fit to their lifestyles.
- Poor photography can cause confusion, mistrust or even carts getting thrown away.
Building Trust Through Quality Photos
In the world of digital trust is the primary currency. Customers must feel at ease with the product and the brand prior to making an purchase. Good quality images of the product promote confidence in a variety of ways.
- They show professionalism, demonstrating how much the brand values the presentation.
- Sharp, clear images create an impression of authenticity and transparency, while ensuring that there are no flaws hidden.
- Consistent lighting and precise colors allow customers to make informed decisions.
- Images that are clear cut the chance of returning products by establishing realistic expectations.
- Customers are more likely to be regular buyers of brands that focus on quality images.
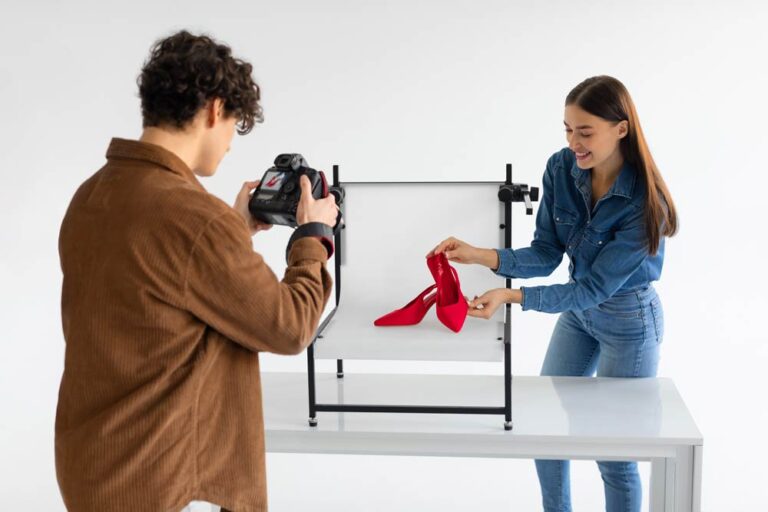
Key Elements of Successful Ecommerce Photography
Capturing Product Details using accuracy
The devil lies in the details. And when you’re dealing with e-commerce photography accuracy is the key. The customer wants to know every part of the item so that they feel as if they’re holding the item in their own hands.
- Concentrate on close-up shots that show the stitching, texture, or the material.
- Make use of macro lenses to capture intricate details like engravings, or small parts.
- Showcase packaging when it’s an element or the reason for selling, making sure that the experience of unboxing is captured.
- Highlight the unique features of the product and make them the focus of the picture.
- Use neutral backgrounds to prevent distracting the eye from the work.
Showcasing Multiple Angles to Boost Confidence
A variety of views on an item can greatly improve confidence in the customer, by providing an accurate picture, and also allowing less questions to remain unanswered.
- Side, front, back and top-down shots make sure clients understand the entire structure.
- Include zoomed-in images of materials and textures as well as critical elements.
- Present the product used in order to demonstrate its capabilities.
- A 360-degree view, or rotating images give you an interactive experience.
- Make sure images are aligned and frame them in a consistent manner for a smooth appearance.
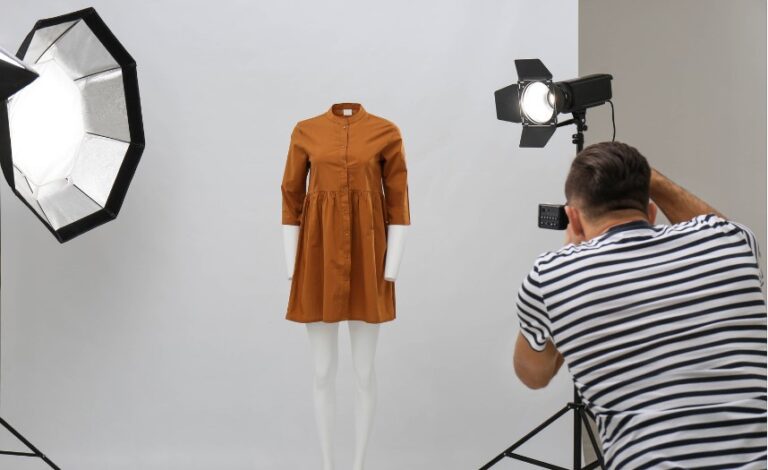
Lighting: The Foundation of Perfect Shots
Natural Lighting vs. Artificial Lighting: What Works Best?
Lighting can be the difference between a good and bad the look of a photograph and ecommerce photography isn’t an exception. A proper lighting setup ensures that the product appears real while also increasing its value.
- Natural lighting provides a warm and even light that’s great for outdoor and lifestyle items.
- Artificial lighting gives you control over intensity and direction, making it ideal to ensure consistent studio photos.
- Softboxes and diffusers are helpful in avoiding the harsh shadows that block out product particulars.
- Think about lighting colors that reflect the real-world appearance of the product.
- Try experimenting with different lighting settings to find the perfect balance of highlight and shadow.
Achieving Flawless Lighting in Low-Budget Setups
Even if you don’t have an expert studio setup you can get great outcomes by playing around with inexpensive or DIY options.
- Use daylight near large windows for free, even lighting.
- Make DIY light diffusers using transparent plastic or white sheets to help soften shadows.
- Utilize LED light bulbs that cost less money and with variable brightness levels.
- Install reflectors (or DIY using posters of white) to reflect light and diminish shadows.
- Consider investing in lightboxes that are affordable for small products that provide all-round lighting.
Choosing the Right Background for Ecommerce Photos
White Background in contrast to. Lifestyle Context when to use each
The background has a significant impact on the way a product is perceived. Each option serves a function according to the product’s category and intended audience.
- White backgrounds look clean and professional and perfect for listing on marketplaces where consistency is crucial.
- The backgrounds of a lifestyle are great for businesses selling products that are aspirational and allow buyers to visualize the product in real-world settings.
- White backgrounds concentrate on the product, removing distractions.
- Lifestyle or context-based settings work best with furniture, fashion or other decor items.
- Choose the background based on where the image will be displayed–marketplaces often prefer plain backdrops, while websites allow more creativity.
How Background Choice Impacts Product Perception
Your choice of background directly affects the way customers perceive the product, impacting their overall impression of quality and the use case.
- A simple background gives the product a look contemporary, elegant and professional.
- A background with a lifestyle theme can add emotional value by linking the product to a particular life style or aspiration.
- Neutral backgrounds emphasize the features of the product that ensure accuracy of color and clarity.
- Backgrounds that are too busy or unsuitable can distract the user, taking away from the overall experience.
- A well-curated background can enhance brand narratives, and set the tone for your customer’s experience.
Camera Equipment Essentials
DSLR and. Mobile Photography: Which is More suited to e-commerce?
Technology has advanced to the point where smartphones can produce professional-quality pictures However, does this make them the most suitable choice to sell online?
- DSLRs give you greater control over the depth of field, focus and aperture settings.
- Smartphones are lighter and user-friendly, which makes them perfect for snapping quick shots on the go.
- For smaller companies with low budgets, premium smartphones can create high-quality pictures.
- DSLRs are perfect for large-scale shooting in which precision and details are crucial.
- The choice should take into account the type of product you are selling, your team’s ability, and the desired image quality.
Must-Have Accessories for Product Photography
Even with a great equipment, accessories could help take your photography for e-commerce beyond the norm, increasing the quality and convenience.
- Tripods provide stability and help minimize blurring in your photographs.
- Lighting kits, like rings or softboxes, offer even lighting.
- Reflectors can help bounce light off and reduce shadows.
- A remote shutter control reduces camera shake when shooting.
- Portable lightboxes can provide constant professional lighting for small items.
The Power of Angles and Composition
Techniques for Highlighting Product Features
Knowing the right composition and angles to shoot from can make a an enormous impact on how your product is perceived.
- Make use of your “rule of thirds” to frame your project by drawing the eye of the viewer naturally to the key elements.
- Take pictures from a variety of angles to highlight distinct design elements or functional elements.
- Think about overhead flat-lay photography when it comes to small items such as cosmetics or other accessories.
- Close-ups of photos could reveal textures, patterns or even fine details that the naked eye may miss.
- Try out leading lines or the depth of field in order to make an even more dynamic composition.
How to Use Angles to Create a 360-Degree View Experience
A 360-degree view of your product does not just increase customer satisfaction, but also boosts sales by displaying the product from every perspective.
- Snap images every 15 degrees, which ensures smooth transitions between images.
- Use rotating platforms on small objects to ensure that they remain at the same angles.
- Concentrate on keeping the shadows and lighting consistent throughout all shots.
- Be sure that the product is centered within each frame to ensure an effortless experience.
- Utilize software to stitch the images, resulting in an interactive 360-degree perspective of the product.
Mastering Product Staging
The Art of Minimalism: Less is More in Ecommerce
Minimalism plays an important role in the staging of products for photography. By minimizing distractions, you let the product stand out in the photo.
- Simple layouts highlight the main features of the product without clutter.
- Clean, spacious spaces in photographs create a sleek modern style that appeals to shoppers on the internet.
- A lot of props or complicated backgrounds can overwhelm viewers and make the work appear unnatural.
- Simple staging helps the product appear more accessible and more relatable.
- Minimalist design is extremely effective for tech and luxury items and gives them a more sophisticated elegant appearance.
Enhancing Product Attraction through Strategic Props
While minimalism is necessary however, the appropriate props will make your product more appealing by adding context or highlighting the distinct attributes.
- Props should be a complement rather than overpower the product. Think of them as characters supporting the product.
- Select props that are representative of the life style or use of your product. This gives purchasers an idea of how it is a part of their lives.
- For fashion or clothing including accessories like bags or watches will make your outfit appear complete.
- Textures such as marble or wood can add warmth and depth to the picture without drawing focus away from the item.
- Avoid bright or stark colors on props that could distract attention from the main object.
Importance of Consistency in Ecommerce Photography
Creating a Cohesive Visual Brand Identity
Consistency is crucial to build an identity for a brand’s visual appearance in the world of e-commerce photography. Each image should be consistent with the same aesthetic, tone and quality that makes your brand immediately recognized.
- A consistent lighting and angle and editing ensure seamless browsing experiences for customers.
- Keeping the same standards across categories of products increases professionalism and confidence.
- A coherent visual identity assists in establishing specific colors or styles to your brand’s image in the consumer’s mind.
- A minimalistic design can make your site appear more user-friendly and organized.
- Consistent branding reinforces your values and distinguishes you from your competitors.
Batch Editing for Uniform Results Across Platforms
Batch editing is a great method of ensuring consistency while processing large amounts of images. It makes sure that all photos are in line with the same visual guidelines.
- Adjust the exposure, color balance and sharpness in batches to keep the color balance and exposure consistent.
- Make sure that each category of product utilizes similar intensities and contrasts to ensure an overall style.
- Batch processing speeds up the process and allows users to add filters, presets or other effects to hundreds of photos with little effort.
- Platforms such as Shopify or Amazon might require certain dimensions for images. Batch resizing is a way to ensure compliance.
- Automating specific editing tasks decreases the possibility of discrepancies between the images.
Photo Editing Techniques for Ecommerce Success
Basic Editing Tools to Perfect Every Shot
Even the best-staged images require some editing to ensure they are ready for web use. Simple editing tools can dramatically improve the clarity, color and appearance of your photos.
- Set the brightness and contrast so as to make sure that the item stands out from the background.
- Crop and align images in order to create symmetry and focal.
- Achieve the correct balance of colors to ensure the color of the product is exactly like the real thing as it is.
- Sharpen the details to emphasize details and intricate design elements.
- Eliminate minor imperfections or distractions with spot healing tools.
Advanced Retouching for Professional Results
For more complicated items or high-end eCommerce shops, modifying your photos with advanced techniques could bring your photos up to a professional standard.
- Layer masking is a method of selective editing that doesn’t affect any other parts of your image.
- Techniques like dodge and burn can aid in shaping shadow and light to create dramatic effects.
- Cloning tools are able to remove undesirable reflections or imperfections like wrinkles, dust, or dirt in fabrics.
- Gradient filters can give depth to the image, and make sure that it is correctly highlighted.
- Advanced retouching may involve changing the shape or liquidity of elements to eliminate distortions or improve proportions.
Optimizing Images for Web Performance
How to Resize and Compress Photos Without Losing Quality
The size of your image can have a huge impact on your site’s load speed. Ecommerce sites that have slow speeds will lose customers fast. Optimizing images with no compromise on quality is vital.
- Make use of JPEG formats to compress images without any loss in quality. Ideal for all images of products.
- For logos or backgrounds that are transparent For logos or transparent backgrounds, use PNG images for sharper edges.
- Resize images according to the exact dimensions needed by your platform, thus avoiding excessive loading time caused by oversized images.
- Tools such as TinyPNG or ImageOptim are able to compress files while preserving the visual integrity.
- Keep images under 100KB to ensure optimal performance on the web without any pixelation.
The Impact of Image Optimization on Site Speed and SEO
Optimized images don’t just enhance the user experience, but they also impact the search engine rankings of your website. Websites that are faster generally appear higher on Google and other search engines.
- Reduced file size improves the speed of loading pages and is a major aspect of SEO. Google’s SEO algorithm.
- Optimized images reduce bounce rates and keep customers engaged on your site for longer.
- Rapider loading times translate into greater user engagement and better conversion rates.
- Search engines favor mobile-optimized websites therefore ensure that images load fast on devices with smaller screens.
- Optimized images properly can help reduce the load on servers, thereby improving the overall performance of your site.
Incorporating Lifestyle and Contextual Photography
Why Lifestyle Photography Can Drive Higher Engagement
Lifestyle photography gives an understanding of the product’s their use, and helps consumers see how they will use the product in their daily lives.
- Lifestyle photos tell a story that makes products appear more relatable and appealing.
- They create emotions, which helps customers to feel a connection to the product.
- These kinds of photos are great for social media, since engagement tends to be higher when it comes to images that are lifestyle related.
- Customers are more inclined to share images of their lives which can increase the reach of your brand.
- Showing products in context will help consumers understand the dimensions of the product, its fit, and the functionality.
Tips for Creating Authentic, Relatable Product Scenes
The most important thing to consider when it comes to life-style photography is authenticity. Customers want authentic examples of how products can improve their lives.
- Utilize natural lighting to keep from the overly artificial or staged appearance.
- Choose the right models or settings that correspond to your viewers’ lifestyle and demographics.
- Include elements that help the scene feel more alive like a casual drop of tea or a closed book.
- Focus to the object, and make sure it’s a natural part of the environment.
- Be careful not to over-style, as it can make the look seem unrealistic or impossible to achieve.
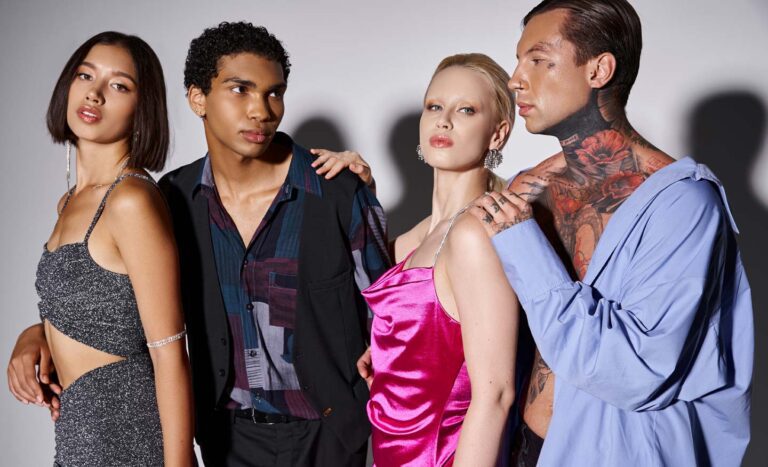
Integrating Models in Ecommerce Photography
Choosing the Right Models to Represent Your Brand
Models are a part of your brand’s image, and choosing the right model to represent your brand is crucial to align with the people you want to reach.
- Take into consideration diversity to appeal to an broader group of people and reflect the current trend of inclusivity.
- Select models whose look and style are in line with the ethos of your company and its customer base.
- Be sure the models communicate the intended message or emotion that is behind the item.
- For the most fashionable brands, pick models that are proportionate to the way that the item will be worn by real-life customers.
- Models should be authentic and genuine since too polished or glamorous photos could turn off customers.
The Style of Models so that they align with the Brand Messaging
Model style plays a crucial part in how your brand’s image is perceived. It should reflect your company’s character while also appealing to the people you want to reach.
- Make sure that your clothes, makeup, and accessories to your brand’s tone – whether elegant, casual or flamboyant.
- Small details, such as hairstyles or posture, can dramatically affect the tone of an image.
- Maintain a minimalist style if your goal is to focus on the product. Avoid the temptation to overshadow it by adding too many accessories.
- Check that the overall style of the model matches the environment, forming an overall story.
- The style of your clothes must reflect the lifestyle your brand promotes whether that’s outdoor adventure or urban chic luxurious living.
The Rise of 360-Degree Product Photography
Benefits of Offering a Full View of Products
As the growth of online shopping increases as does the need of interactive experience. 360-degree photography is an example of a feature that lets consumers look at a product from every angle, emulating the in-store experience.
- Allows customers to scrutinize every detail in order to build confidence and trust.
- Customers are no longer required to zoom into or request additional images.
- Improves conversion rates because customers are more educated and happy with their experience of the product.
- 360-degree views work best for technical or expensive items in which details are important.
- Improves your overall shopping experience, making your website more modern and engaging.
Tools and Techniques to Create 360-Degree Images
The creation of 360-degree images for products needs specific software and meticulous plan to ensure smooth outcomes.
- Utilize a rotational turntable to take consistent photos from every angle.
- Put the camera up on a tripod in order to ensure stability throughout the shooting.
- Snap between 24 and 72 images to ensure smooth rotation, dependent on the size of the item.
- Join the images with a program like Adobe After Effects or specialized 360-degree tools.
- Make sure that the lighting is uniform across all angles to prevent shadows or color variations.
Understanding the Importance of Product Videos
Why Adding Video Content Enhances the Shopping Experience
Videos of products add a lively aspect to photography for e-commerce by demonstrating the items in the action. Videos are a great way to demonstrate capabilities, features and even scale in ways that still photos are unable to.
- Videos improve customer engagement by staying in the mind longer than static images.
- They help you gain a better understanding of the way products work or appear when they are employed.
- Videos can be used to showcase benefits or features which are not obvious in photographs.
- Video-based products typically have higher conversion rates and less returns.
- Videos enhance the shopping experience, making shoppers feel more enthused about the product and its brand.
Basic Steps to Creating Engaging Product Videos
Making videos for your products doesn’t need to be difficult or costly. By adhering to a few fundamental guidelines, you can make engaging content that can increase sales.
- Create a storyboard that outlines the important features of your product that you wish to draw attention to.
- Keep your videos brief and concise. Aim at 30-60 minutes for the best engagement.
- Make sure your background is clean and does not distract from the design.
- Add captions or text overlays that draw attention to key benefits or features.
- Utilize multiple angles and close-ups in order to expose the product in all clarity.
These sections continue to build upon the foundational principles of ecommerce photography, addressing how staging, consistency, editing, and technology work together to enhance the online shopping experience.
Enhancing the Ecommerce Photography using Technology
Exploring AI Tools for Product Photography Automation
The advent of AI (AI) has transformed e-commerce photography, allowing companies to simplify their processes and increase the quality of their images with little effort.
- AI-driven tools are able to automatically alter images, eliminating imperfections or background noise with preciseness.
- Algorithms can help you choose the best lighting and composition as well as angles depending on the type of product making it less necessary to make manual adjustments.
- AI-powered tools aid in automatic categorization and tagging making it easier to upload the process for catalogs of large products.
- Deep learning models analyse previous successful photos to suggest different techniques to shoot in the future.
- AI can assist in creating synthetic models or even environments, removing the necessity for expensive shootings in person.
Augmented Reality and the Future of Virtual Product Viewing
Augmented Reality (AR) could be the future step in e-commerce photography. It gives shoppers an immersive and interactive experience. Through blending digital technology with reality, AR gives customers the ability to experience products within their own environment.
- AR allows users to “place” products like furniture or home decor into their area, making it easier to imagine the end result.
- For fashion-focused brand, AR enables virtual try-ons which allow customers to see what clothes or accessories look on their body.
- The technology improves customer interaction and provides a distinctive shopping experience that will make your brand stand out.
- AR reduces the need for physical return since the customers feel more confident in their purchases.
- Augmented reality tools are able to be integrated into applications for mobile devices, making shopping experience more personalized and interactive.
Creating Photos for Different Ecommerce Platforms
Adjusting photography to meet Amazon, eBay, and Shopify Requirements
Each platform for e-commerce comes with its own set of guidelines for photographing products following these guidelines is vital to maximising sales and visibility.
- Amazon demands images that have white backgrounds that are pure and at least 85% of image area is taken up by the product, which ensures that the attention remains on the product.
- eBay is known for its detailed, high-resolution images that display different angles of the item which helps increase trust among buyers.
- Shopify gives users more flexibility when it comes to background selections, however it insists on optimizing images to guarantee fast loading times and top-quality displays.
- Knowing what technical specifications, including size, formats (JPEG, PNG), and dimensions is essential to avoid penalties or issues with visibility.
- A consistent adherence to the guidelines of the platform can lead to better search engine rankings and increased visibility which can lead to better conversion rates.
Platform-Specific Tips for Optimizing Image Quality
Beyond following the guidelines, each platform is unique and can influence how images of your products are perceived and presented. Making sure your images are optimized for these particular requirements will help your products are noticed.
- On Amazon you can use zoomable images that offer customers a closer glimpse of the product’s details like details or textures.
- For Shopify use lifestyle photos along with product images to enhance the shopping experience.
- On eBay try the different perspectives and background to distinguish your item from other sellers in a marketplace that is crowded.
- Test A/B on a variety of platforms to determine what image formats and styles are more engaging and increase conversion rates.
- Make sure to compress images in a way that is appropriate for each platform in order to avoid long loading times that could deter buyers.
Managing and Organizing Ecommerce Photo Shoots
How to Plan a Seamless Workflow for Large-Scale Photography Projects
Effective management of e-commerce photography is essential especially when dealing with huge catalogs of goods. A systematic approach will help to save time and resources while also ensuring high quality throughout all photos.
- Start by preparing a detailed shot list, making sure that the angles, sizes and variations are properly accounted for.
- Create a mood board, or style guide to ensure the visual consistency, particularly if several photographers or teams are involved.
- The shoot should be broken down into manageable segments, focusing on similar categories of product in one session to speed up the process.
- Set up a consistent configuration for camera and lighting to eliminate the necessity for changes between photos.
- Set clear naming conventions to images, making it easier to follow and edit images after shooting.
Tips for Organizing Product Photos for Easy Access and Editing
After taking photos It is essential to organize and organize them to make them available for use in the future. A well-organized file management system saves time and eliminates confusion, particularly when dealing with thousands of photos.
- Utilize subfolders and folders to organize images according to product kind, color or even the category.
- Make descriptive file names available which include the name of the product SKU, the name of the product, and any relevant metadata to facilitate search.
- Consider investing in the digital asset management (DAM) system to save tags and retrieve images across departments and teams.
- Make sure you backup your files regularly to ensure that your data is not lost particularly for shoots with high value.
- Utilize editing software that permits batch processing, which allows users to make global changes without editing each image individually.
Common Mistakes in Ecommerce Photography (and How to Avoid Them)
Poor Lighting and Blurry Images: Quick Fixes for Common Errors
The most common errors in photography for ecommerce is poor lighting. This can make it difficult to see product information and decrease the quality of photos overall.
- Always make sure to use the correct lighting settings. Natural lighting is best, but softbox lighting can be useful in studio settings.
- To prevent blurring, utilize a tripod to stabilize your camera, which will ensure clearer pictures.
- Try different lighting settings on various items, since objects with darker or reflective hues might require adjustments to the light.
- Set settings for the ISO or aperture levels of your camera to regulate the brightness, without sacrificing clarity.
- If you see dark shadows, or uneven light levels you can use reflectors to soften or balance the lighting.
Over-editing in contrast to. Under-editing Finding the Balance
Editing is a crucial aspect of photography for e-commerce, but finding the right balance between editing too much and under-editing is a difficult task.
- Be careful not to over-saturate colors as it can cause products to appear unreal and cause the displeasure of customers.
- Be sure to keep in mind important details such as natural imperfections or texture of the product. They aid in establishing authenticity.
- The result of under-editing, on one the other hand, can lead to dull photos that do not draw attention or highlight the product’s attributes.
- Concentrate on enhancing natural light and colors, without radically altering the appearance of your product.
- Use retouching tools in moderation and only to eliminate obstructions such as scratches or dust and in order to not alter fundamental features.
In the end, understanding the art of e-commerce photography is essential to build an online business that is successful. Quality images not only grab attention, but they additionally play a significant impact on buying choices, increasing trust among customers and reducing returns. By insisting on consistency, innovation and utilizing the power of technology, brands are able to enhance their product presentation and make a mark in the online marketplace. Through optimizing images to perform better on the internet and incorporating lifestyle photography or taking advantage of future trends such as AI and AR investing in ecommerce photography is a way to invest in the long run. With the right approach photography can help transform your business, boost conversions, and build lasting relationships with your customers.

Photo Editing for TikTok Shop Sellers: What Works in 2026
📂 Categories 🛒 Ecommerce Business 📸 E-commerce Photo Tips 🖼️ Platform Image Req. 📦 Amazon…

“Why Your Ecommerce Store Needs Professional Photo Editing”
📂 Categories 🛒 Ecommerce Business 📸 E-commerce Photo Tips 🖼️ Platform Image Req. 📦 Amazon…
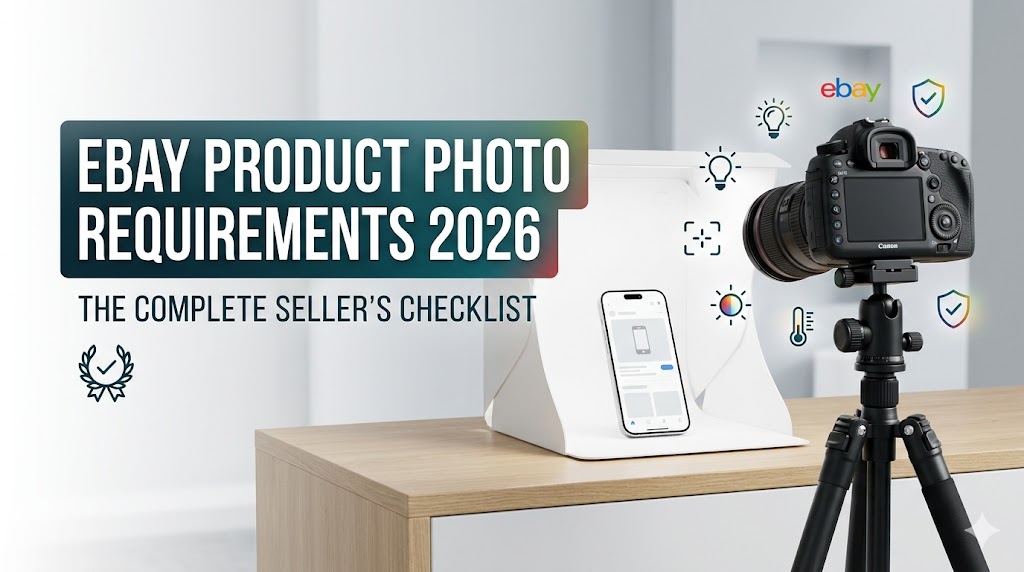
eBay Product Photo Requirements 2026: The Complete Seller’s Checklist
📂 Categories 🛒 Ecommerce Business 📸 E-commerce Photo Tips 🖼️ Platform Image Req. 📦 Amazon…

Drop Shipping Product Photos: How to Stand Out When Competitors Use the Same Images
📂 Categories 🛒 Ecommerce Business 📸 E-commerce Photo Tips 🖼️ Platform Image Req. 📦 Amazon…

AI vs Manual Photo Editing for Ecommerce: Which Delivers Better ROI?
📂 Categories 🛒 Ecommerce Business 📸 E-commerce Photo Tips 🖼️ Platform Image Req. 📦 Amazon…
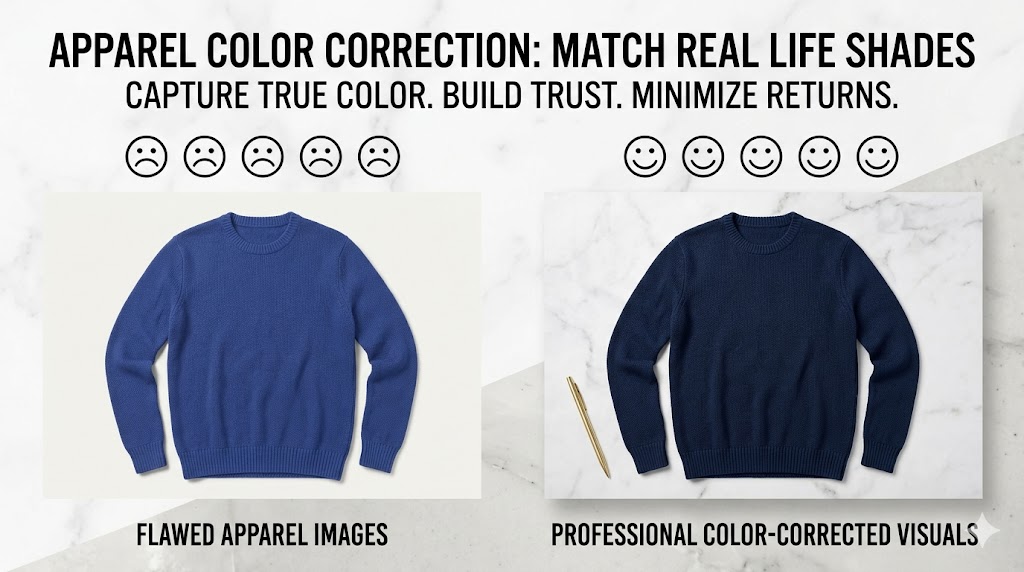
Color Correction for Apparel Photos: Match What Customers See in Real Life
📂 Categories 🛒 Ecommerce Business 📸 E-commerce Photo Tips 🖼️ Platform Image Req. 📦 Amazon…