Whether you’re an aspiring graphic designer, a photographer, or a social media enthusiast, knowing how to remove a background in photoshop can enhance your creative endeavors. In this article, we will explore various techniques and tools that will help you accomplish this task with precision and finesse.
Introduction
Removing the background from an image involves isolating the main subject and eliminating the surrounding elements. This technique allows you to place the subject on a different background or use it in various graphic designs seamlessly. From product photography to creating stunning photo manipulations, background removal opens up a world of possibilities.
Understanding Background Removal
Background removal finds its application in a wide range of industries. E-commerce businesses often require product images with transparent backgrounds to display their merchandise effectively. Graphic designers use background removal to combine multiple elements seamlessly. Even photographers need to remove distracting backgrounds to emphasize their subjects. By mastering background removal techniques in Photoshop, you can cater to these diverse needs.

Using Photoshop’s Magic Wand Tool
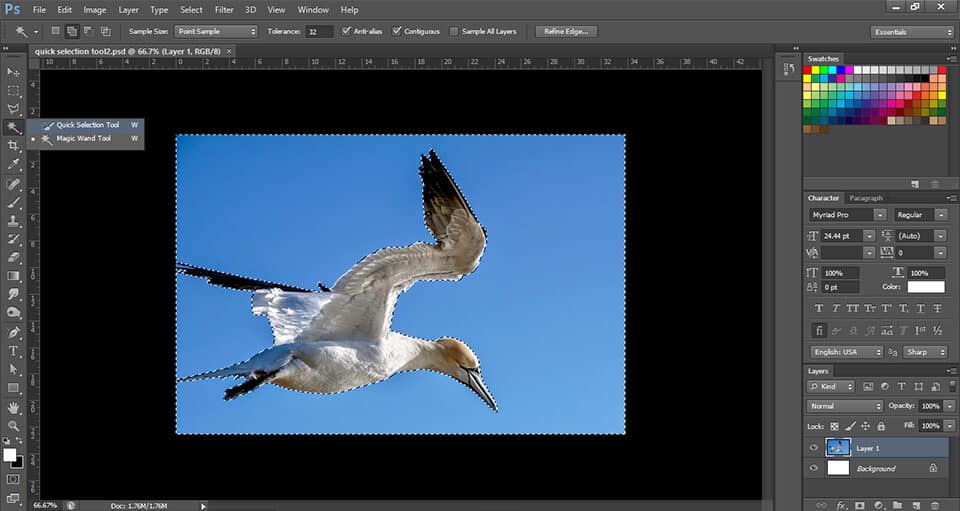
One of the simplest tools for removing backgrounds in Photoshop is the Magic Wand tool. This tool allows you to make selections based on color similarity and quickly remove large areas of the background. To use the Magic Wand tool effectively, follow these steps:
- Open your image in Photoshop.
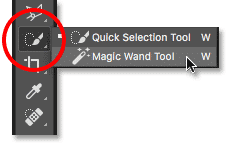
- Select the Magic Wand tool from the toolbar.
- Adjust the tolerance to control the tool’s sensitivity.
- Click on the background area you want to remove.
- Refine your selection by adding or subtracting areas using the Shift or Alt key.
- Once the desired background is selected, press the Delete key to remove it.
- Fine-tune the selection by using the Eraser tool or the Brush tool with a soft edge.
- Repeat the process for any remaining areas that need to be removed.

The Magic Wand tool is a great option for images with distinct backgrounds and solid colors. However, it may not produce accurate results for images with complex backgrounds or fine details. In such cases, it’s best to explore more advanced techniques.

Mastering the Pen Tool Technique
The Pen Tool is a powerful tool that offers precise control over selections and is ideal for images with intricate or irregular shapes. To remove backgrounds using the Pen Tool, follow these steps:
- Open your image in Photoshop.
- Select the Pen Tool from the toolbar.
- Zoom in on the image for better accuracy.
- Start by clicking on the edge of the subject and create anchor points to outline the shape.
- For curved lines, click and drag to create curved anchor points.
- Continue outlining the subject by creating anchor points along the edges.
- To create smooth curves, adjust the direction handles of the anchor points.
- Once the subject is fully outlined, right-click and choose “Make Selection.”
- Select “New Layer via Copy” to separate the subject from the background.
- Hide or delete the original background layer to reveal the transparent background.
The Pen Tool requires practice to achieve precise selections, but it offers unparalleled control and accuracy, especially for complex shapes.

Exploring the Quick Selection Tool
The Quick Selection tool is a handy option for images with well-defined subjects and contrasting backgrounds. It allows you to make selections based on brush strokes and automatically detects the edges. To remove backgrounds using the Quick Selection tool, follow these steps:
- Open your image in Photoshop.
- Select the Quick Selection tool from the toolbar.
- Adjust the brush size based on the area you want to select.
- Click and drag the brush over the subject to make a selection.
- To add or subtract areas, use the Add to Selection (+) or Subtract from Selection (-) options.
- Refine the selection by using the Refine Edge brush for detailed areas.
- Once the selection is accurate, press the Delete key to remove the background.
- Use the Eraser tool or the Brush tool with a soft edge to clean up any remaining imperfections.

The Quick Selection tool is a time-saving option for images with clear boundaries, but it may require additional refinement for complex backgrounds.
Utilizing Layer Masks for Background Removal
Layer masks provide a non-destructive way to remove backgrounds and offer flexibility for fine-tuning selections. To remove backgrounds using layer masks, follow these steps:
- Open your image in Photoshop.
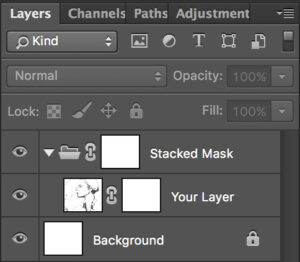
- Duplicate the background layer by right-clicking and choosing “Duplicate Layer.”
- Select the layer mask icon at the bottom of the Layers panel to add a mask to the duplicated layer.
- Use a selection tool of your choice to make a rough selection of the subject.
- Refine the selection by using tools like the Brush tool or the Pen Tool.
- Once the selection is accurate, press the Alt key and click on the layer mask thumbnail to enter the mask editing mode.
- Use the Brush tool with black color to paint over the areas you want to hide (remove the background).
- Use the Brush tool with white color to paint over the areas you want to reveal (bring back the subject).
- Adjust the brush opacity to create smooth transitions and blend the edges.
- Use the Eraser tool with a soft brush to clean up any remaining imperfections.
- Fine-tune the mask by using tools like the Brush tool and the Gradient tool.
- To view the image with a transparent background, hide or delete the original background layer.


Layer masks allow you to make adjustments and modifications to the mask without permanently altering the image. This makes it a versatile and flexible method for background removal.
Removing Backgrounds with the Background Eraser Tool
The Background Eraser tool is specifically designed to remove complex backgrounds and preserve intricate details. To remove backgrounds using the Background Eraser tool, follow these steps:
- Open your image in Photoshop.
- Select the Background Eraser tool from the toolbar.
- Adjust the brush size and hardness based on the area you want to erase.
- Set the sampling option to “Continuous” for smoother transitions.
- Click and drag the brush over the background area you want to remove.
- Adjust the tolerance level to control the tool’s sensitivity.
- Be cautious near the edges of the subject to avoid erasing important details.
- Use short, gentle strokes to gradually remove the background.
- Zoom in and use a smaller brush size for precision in intricate areas.
- Once the background is removed, save the image with a transparent background.
The Background Eraser tool is highly effective for images with complex backgrounds, such as hair or foliage. It provides fine control and preserves delicate details.
Advanced Techniques for Background Removal
In addition to the aforementioned techniques, Photoshop offers advanced tools like Refine Edge and Select and Mask, which provide even greater control and accuracy in background removal.
- Refine Edge: This feature allows you to refine selections and edges with precision. It provides options to smooth edges, feather selections, and adjust contrast for better results.
- Select and Mask: This tool offers advanced selection capabilities with intelligent edge detection. It enables you to refine selections using options like the Refine Edge Brush, the Brush tool, and the Decontaminate Colors feature.
These advanced techniques require practice and experimentation to master. They are particularly useful for images with complex backgrounds, detailed subjects, or challenging edges.

Saving and Exporting Images with Transparent Backgrounds
Once you have successfully removed the background from your image, it’s important to save it with a transparent background to maintain its versatility. Photoshop offers various file formats that support transparency, such as PNG and TIFF. To save an image with a transparent background, follow these steps:
- Go to File > Save As.
- Choose the desired file format, such as PNG or TIFF.
- Make sure the “Transparency” option or “Alpha Channel” is selected.
- Adjust any additional settings, such as compression or resolution.
- Click “Save” to preserve the image with its transparent background.
Saving images with transparent backgrounds allows you to use them in various projects without worrying about unwanted backgrounds interfering with the overall design.
Removing backgrounds in Photoshop is a valuable skill that can enhance your creative projects and streamline your workflow. Whether you prefer the simplicity of the Magic Wand tool or the precision of the Pen Tool, mastering these techniques opens up a world of possibilities in graphic design, photography, and digital art.
Remember, practice is key to improving your background removal skills. Experiment with different tools and techniques, and don’t be afraid to make mistakes. Through trial and error, you’ll gain confidence and achieve more accurate and professional-looking results.
So, go ahead and unleash your creativity by removing
backgrounds in Photoshop and taking your visual projects to the next level. With the variety of tools available in Photoshop, such as the Magic Wand, Pen Tool, Quick Selection, Layer Masks, and Background Eraser, you have the flexibility to choose the method that suits your specific needs.
Remember to keep practicing and experimenting with different techniques to refine your skills. Removing backgrounds in Photoshop requires patience and attention to detail, but with time, you’ll become more proficient and efficient.
Now that you have a solid understanding of various background removal techniques in Photoshop, it’s time to put your knowledge into action. Start exploring different images, test out the tools and techniques discussed in this article, and see the transformation that can be achieved by removing backgrounds.
In conclusion, mastering the art of background removal in Photoshop empowers you to create stunning visuals, whether it’s for professional projects or personal creativity. Take advantage of the diverse range of tools available, practice regularly, and don’t be afraid to experiment. By removing backgrounds, you open up a world of possibilities for graphic design, photography, and artistic expression.
FAQs (How to Remove a Background in Photoshop?)
1. Can I remove the background from any image in Photoshop?
Yes, you can remove the background from almost any image in Photoshop. However, the ease and accuracy of the process may vary depending on the complexity of the image and the technique you choose to use.
2. How can I deal with complex backgrounds, such as hair or intricate patterns?
For complex backgrounds, techniques like the Pen Tool, Select and Mask, or Background Eraser can be particularly useful. These tools provide greater control and precision to handle intricate details.
3. Is it possible to recover a deleted background after saving the image?
Once you save an image after removing the background, the deleted background information is permanently lost. It’s always recommended to work on a duplicate layer or keep a backup of the original image to revert if needed.
4. Can I remove backgrounds in Photoshop Elements, or is it limited to Photoshop?
Both Photoshop and Photoshop Elements offer various tools and techniques for background removal. While Photoshop provides a wider range of advanced features, Photoshop Elements still provides effective tools like the Magic Wand and Quick Selection for basic background removal.
5. Are there any automatic background removal tools in Photoshop?
Photoshop does offer features like the Object Selection tool and the Select Subject command, which use advanced algorithms to automatically detect and select the main subject in an image. While these tools can speed up the initial selection process, manual refinement is often required for precise background removal.
How Outsourcing Photo Editing Boosts Your Business
In the fast-paced digital age, the visual representation of your business is paramount. High-quality images…
How to Plan the Perfect Mommy and Me Photoshoot
beautiful mother and daughter in white dresses sitting back to back and smiling at camera…
Wedding Party Photos: Trends to Try in 2024
Wedding Party Photos: Trends to Try in 2024 Embracing New Trends in Wedding Party Photos…
How to Increase Ecommerce Conversion Rate?
How to increase ecommerce conversion rate? Introduction Overview of Ecommerce Conversion Rates Ecommerce conversion rates…
How to Edit Passport Size Photo? Like a Pro: From Snap to Official Stamp
Choosing the Right Tools for Editing Understanding Different Editing Tools When it comes to editing…
How to Fix Blurry Photos in Photoshop? 2 Minute Fixes!
How to Fix Blurry Photos in Photoshop? 2 Minute Fixes! Introduction Uh oh, just downloaded…


